These simple mittens are soft and stylish for Fall, or Spring. The free crochet pattern is designed to fit teen’s and women’s hands, and there are notes for adjusting the length as well as the wrist circumference. Find the free crochet pattern instructions below, or purchase a print-optimized, ad-free PDF by clicking here.
Click here to add this pattern to your Ravelry queue!
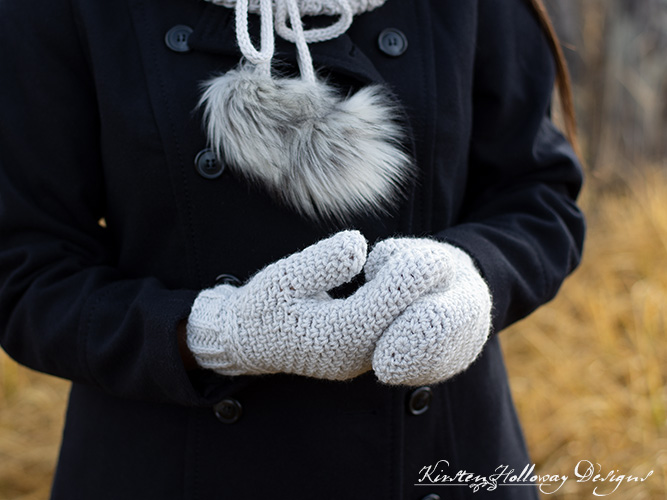
These versatile mittens were designed to match the Misty Hollow cowl and Misty Hollow hat set, but because of their basic construction and texture they will go with a wide variety of hat and scarf patterns. They were designed as a collaboration between American Crochet and myself (more pieces will be added on her site soon!)
I wrote this crochet pattern in one size, but have included notes for adjusting the length of the mitten as well as the width of the wrist band. It’s a very basic design worked from the bottom up so I am sure you will figure these things out quickly. The band is crocheted separately, and thumb is also worked after the body of the mitten is completed. There are 2 patterns: 1 for the right hand and one for the left hand.
The pattern for these crochet mittens calls for #3 light weight yarn making the finished mittens perfect for fall and spring or mild winter weather. Due to the nature of the stitches used these mittens will not be sutible for playing in the snow. However, they will be perfect for special occasions!

The Granite stitch is super easy to crochet and it is known by several different names: the Moss Stitch, and the Seed Stitch being the most common. It gives a knit look because of the way the stitch is worked. You will do a row alternating single crochet and chain-1 spaces, then going back the other direction working a single crochet in each chain space and a chain-1 over top of each single crochet. The only places where this will be different are the increases and decreases.
Just in case you haven’t seen the Misty Hollow hat, cowl and mitten set together here’s a picture showing them off:

My model for this set was so much fun to work with (just as sweet and fun as that smile shows)! Can’t you imagine your daughter, granddaughter, or niece wearing this ensemble? 🥰
Disclaimer: This post contains affiliate links. When you purchase something using these links a small percentage of the sales price goes to me. However, you do not pay any extra for the item you purchase.
Difficulty:
Easy
Materials Needed:
4mm (G) hook, or hook needed to obtain gauge
165-175 yards #3 Bernat Baby Sport yarn in Baby Grey or Cloudburst
Yarn needle
Scissors
Measuring tape (optional)
Stitch markers (optional)
Stitches used:
sl st = slip stitch
sc = single crochet
hdc = half double crochet
sc2tog = single crochet 2 together
hdc2tog = half double crochet 2 together
Additional Terms:
hdc in the 3rd loop = Look at the top of the stitch, and locate the sideways “V”, bend the stitch to look at the back*, and you should see another “V”. You’ll be working into the back loop of that “V”, this is called the 3rd loop. *For this wrist band the textured portion created by working hdc in the 3rd loop should always be facing you when beginning a new row.
st/sts = stitch/stitches
prev =previous
Gauge:
12 sc in 3”, Approximately 17-18 rows give 4” of height.
Measurements:
Women’s size: 9 1/2” long by 4 1/4” wide at widest point. (Length can be adjusted for your hand. See notes in pattern.)
Additional Notes:
-ch 1 at beginning of round does not count as a stitch.
-ch-2 at beginning of round stands for starting ch + ch-1 sp.
-This pattern uses the Granite stitch also known as the Moss stitch or Seed stitch. It is a stitch with a lot of stretch and excellent drape. As a result these mittens should be very comfortable to wear. They are not for keeping out the snow, however, you may try to modify their function by using a #4 yarn and a 3.75mm or 3.25mm hook which should result in a thicker fabric.
-The length of these mittens can be adjusted, so if you have shorter fingers they will still fit. See notes in pattern.
-Pull your joins snug to minimize the seam.
-I recommend using a solid colored, yarn, heathered yarn, or tonal yarn where the tones are very close in color. The seam goes along your index finger on each mitten and will be more noticeable if you use something else.
Easy Granite Stitch Mittens (US Terms):
Click here to purchase an ad-free, print-optimized PDF of this pattern on LoveCrafts
Right-hand mitten:
Round 1: 8 sc in magic circle, join with sl st to first sc. (8)
Round 2: ch 1, (sc, ch 1) in first st, *(sc, ch 1) in next st; repeat from * around, join with sl st to first sc. (8 sc, 8 ch-1 sps)
Round 3: ch 2, *sk st, (sc, ch 1, sc) in ch-1 sp, ch 1, sk st, (sc, ch 1) in next ch-1 sp; repeat from * around, join with sl st to first ch. (12 sc, 1 ch-2 sp, 11 ch-1 sps)
Your piece should be taking on a square shape. We’ll get it back to a round shape soon.
Round 4: ch 1, *(sc, ch 1) in ch-1 sp, sk st, (sc, ch 1, sc) in ch-1 sp, ch 1, sk st, (sc, ch 1) in next ch 1 sp, sk st; repeat from * around, join with sl st to first sc. (16 sc, 16 ch-1 sps)
Round 5: ch 2, *sk st, (sc, ch 1) in next ch-1 sp ; repeat from * around omitting last ch-1 on final repeat, join with sl st to first ch. (16 sc, 1 ch-2 sp, 15 ch-1 sps)
Round 6: ch 1, *(sc, ch 1) in ch-1 sp, sk st; repeat from * around join with sl st to first sc. (16 sc, 16 ch-1 sps)
Repeat rounds 5 and 6 until your mitten measures about 5” long (women’s Large). If you have smaller hands then repeat those rounds until they come up to the bottom of where your thumb attaches, then begin thumb hole.
Round 25: ch 2, sk st, *(sc, ch 1) in ch-1 sp, sk st; repeat until there are 8 sts left in the round, ch 10 more, join with sl st to first ch. (1 ch-11 sp, 12 sc, 11 ch-1 sps, 1 ch-2 sp)
Round 26: ch 1, *(sc, ch 1) in ch-1 sp, sk st; repeat from * around, join with sl st to first sc. Note: when you get to ch-11 sp work sc sts through the chains themselves so you can keep track of your stitch counts. Your final ch of the round will get a sc and a ch-1. You should end up with 6 sc, and 6 ch-1 sps total across this last section. (18 sc, 18 ch-1 sps)
Round 27: ch 2, *sk st, (sc, ch 1) in next ch-1 sp ; repeat from * around omitting last ch-1 on final repeat, join with sl st to first ch. (18 sc, 17 ch-1 sps, 1 ch-2 sp)
Round 28: ch 1, *(sc, ch 1) in ch-1 sp, sk st; repeat from * around, join with sl st to first sc. (18 sc, 18 ch-1 sps)
Round 29: ch 2, *sk st, (sc, ch 1) in next ch-1 sp; repeat from * around omitting last ch-1 on final repeat, join with sl st to first ch. (18 sc, 17 ch-1 sps, 1 ch-2 sp)
Round 30: ch 1, *(sc, ch 1) in ch-1 sp, sk st; repeat from * around, join with sl st to first sc. (18 sc, 18 ch-1 sps)
Round 31: ch 2, *[sk st, (sc, ch 1) in next ch-1 sp] 7 times, sc2tog working through next 2 ch-1 sps, ch 1; repeat, omitting final ch-1, join with sl st to first ch. (32 sts total; 14 sc, 15 ch-1 sps, 1 ch-2 sp, 2 sc2tog)
Round 32: ch 1, *(sc, ch 1) in ch-1 sp, sk st; repeat from * around, join with sl st to first sc. (16 sc, 16 ch-1 sps)In the following round you will be reducing the opening of the top of the mitten by working a couple of hdc2tog sts in the ch-1 sps skipping the sc in the middle. Optional modification: If you have larger wrists and don’t want the opening to be as snug you may work your hdc2tog across the ch-1 sp and sc. This will reduce your round count by 2 instead of 4.
Round 33: ch 1, *hdc in next 13 sts, hdc2tog in next 2 ch-1 sps; repeat, join with sl st to first hdc. (28)
Round 34: ch 1, working in 3rd loop of hdc, hdc in each st around, join with sl st to first hdc. (28)
Round 35: ch 1, working in 3rd loop of hdc, sc in each st around, join with sl st to first sc. (28)
Fasten off, weave in ends.
Thumb:
The beginning round of your thumb hole is something you will need to eyeball. You have worked the granite stitch enough that you should understand the general idea of the stitch pattern: sc in a ch-1 sp, ch 1 over the top of a sc stitch. Your goal is to make sure you end up with 16 sts (8 sc, 8 ch-1 sps) in this round. Your sc2tog stitches should be worked at the 2 opposite sides of your thumb hole. They should draw the top and bottom edge of the hole together. You may place 4 stitch markers in the 2 top stitches and 2 bottom stitches at the ends to help you keep track of where those sc2tog stitches should go.
With back of mitten facing you, attach yarn to right side of thumb hole, using tight tension,
Round 1: Sc2tog, (sc, ch 1) in ch-1 sp, sk st* repeat from * to * across bottom of thumb hole, sc2tog, **(sc, ch 1) in ch-1 sp, sk st** repeat from ** to ** across top of thumb hole. (7 sc, 7 ch-1 sps, 2 sc2tog)
Round 2: ch 2, sk st, (sc, ch 1) in next ch-1 sp, sk st; repeat from * across, join with sl st to first ch. (8 sc, 8 ch-1 sps)
Round 3: ch 1, (sc, ch 1) in next ch-1 sp, sk st; repeat from * across, join with sl st to first ch. (8 sc, 8 ch-1 sps)
Repeat rounds 2 and 3 until the thumb comes to about 1/2” away from the end of your thumb. (Approximately 8-10 rounds)
Decrease round: ch 1, sc in each ch-1 sp around, skipping the sc sts, join with sl st to first sc. (8 sc)
Fasten off leaving 6” tail.
Weave tail through the stitches and cinch shut. Knot securely and fasten off. Weave in end.
See bottom of post for wrist band instructions.
Left hand-mitten:
Round 1: 8 sc in magic circle, join with sl st to first sc. (8)
Round 2: ch 1, (sc, ch 1) in first st, *(sc, ch 1) in next st; repeat from * around, join with sl st to first sc. (8 sc, 8 ch-1 sps)
Round 3: ch 2, *sk st, (sc, ch 1, sc) in ch-1 sp, ch 1, sk st, (sc, ch 1) in next ch-1 sp; repeat from * around, join with sl st to first ch. (12 sc, 1 ch-2 sp, 11 ch-1 sps)
Your piece should be taking on a square shape. We’ll get it back to a round shape soon.
Round 4: ch 1, *(sc, ch 1) in ch-1 sp, sk st, (sc, ch 1, sc) in ch-1 sp, ch 1, sk st, (sc, ch 1) in next ch 1 sp, sk st; repeat from * around, join with sl st to first sc. (16 sc, 16 ch-1 sps)
Round 5: ch 2, *sk st, (sc, ch 1) in next ch-1 sp ; repeat from * around omitting last ch-1 on final repeat, join with sl st to first ch. (16 sc, 1 ch-2 sp, 15 ch-1 sps)
Round 6: ch 1, *(sc, ch 1) in ch-1 sp, sk st; repeat from * around join with sl st to first sc. (16 sc, 16 ch-1 sps)
Repeat rounds 5 and 6 until your mitten measures about 5” long. Then begin thumb hole.
Round 25: ch 11, sk 7 sts, *(sc, ch 1) in next ch-1 sp (the first time it will be the 4th sp in the round), sk st; repeat from * around, sc in final ch-1 sp, join with sl st to first ch. (1 ch-11 sp, 13 sc, 12 ch-1 sps)
Round 26: ch 1, (sc, ch 1) in same st as join, sk st, Note: in ch-11 sp work sc sts through the chains themselves so you can keep track of your stitch counts. You should end up with 6 sc, and 6 ch-1 sps across this section, *(sc, ch 1) in next ch-1 sp, sk st; repeat from * around, join with sl st to first sc. (18 sc, 18 ch-1 sps)
Round 27: ch 2, *sk st, (sc, ch 1) in next ch-1 sp ; repeat from * around omitting last ch-1 on final repeat, join with sl st to first ch. (18 sc, 17 ch-1 sps, 1 ch-2 sp)
Round 28: ch 1, *(sc, ch 1) in ch-1 sp, sk st; repeat from * around, join with sl st to first sc. (18 sc, 18 ch-1 sps)
Round 29: ch 2, *sk st, (sc, ch 1) in next ch-1 sp; repeat from * around omitting last ch-1 on final repeat, join with sl st to first ch. (18 sc, 17 ch-1 sps, 1 ch-2 sp)
Round 30: ch 1, *(sc, ch 1) in ch-1 sp, sk st; repeat from * around, join with sl st to first sc. (18 sc, 18 ch-1 sps)
Round 31: ch 2, *[sk st, (sc, ch 1) in next ch-1 sp] 7 times, sc2tog working through next 2 ch-1 sps, ch 1; repeat, omitting final ch-1, join with sl st to first ch. (32 sts total; 14 sc, 16 ch-1 sps, 1 ch-2 sp, 2 sc2tog)
Round 32: ch 1, *(sc, ch 1) in ch-1 sp, sk st; repeat from * around, join with sl st to first sc. (16 sc, 16 ch-1 sps)
In the following round you will be reducing the opening of the top of the mitten by working a couple of hdc2tog sts in the ch-1 sps skipping the sc in the middle. Optional modification: If you have larger wrists and don’t want the opening to be as snug you may work your hdc2tog across the ch-1 sp and sc. This will reduce your round count by 2 instead of 4.
Round 33: ch 1, *hdc in next 13 sts, hdc2tog in next 2 ch-1 sps; repeat, join with sl st to first hdc. (28)
Round 34: ch 1, working in 3rd loop of hdc, hdc in each st around, join with sl st to first hdc. (28)
Round 35: ch 1, working in 3rd loop of hdc, sc in each st around, join with sl st to first sc. (28)
Thumb:
The beginning round of your thumb hole is something you will need to eyeball. You have worked the granite stitch enough that you should understand the general idea of the stitch pattern: sc in a ch-1 sp, ch 1 over the top of a sc stitch. Your goal is to make sure you end up with 16 sts (8 sc, 8 ch-1 sps) in this round. Your sc2tog stitches should be worked at the 2 opposite sides of your thumb hole. They should draw the top and bottom edge of the hole together. You may place 4 stitch markers in the 2 top stitches and 2 bottom stitches at the ends to help you keep track of where those sc2tog stitches should go.
With back of mitten facing you, attach yarn to right side of thumb hole, using tight tension,
Round 1: sc2tog, (sc, ch 1) in ch-1 sp, sk st* repeat from * to * across bottom of thumb hole, sc2tog, **(sc, ch 1) in ch-1 sp, sk st** repeat from ** to ** across top of thumb hole. (7 sc, 7 ch-1 sps, 2 sc2tog)
Round 2: ch 2, sk st, (sc, ch 1) in next ch-1 sp, sk st; repeat from * across, join with sl st to first ch. (8 sc, 8 ch-1 sps)
Round 3: ch 1, (sc, ch 1) in next ch-1 sp, sk st; repeat from * across, join with sl st to first ch. (8 sc, 8 ch-1 sps)
Repeat rounds 2 and 3 until the thumb comes to about 1/2” away from the end of your thumb. (Approximately 8-10 rounds)
Decrease round: ch 1, sc in each ch-1 sp around, skipping the sc sts, join with sl st to first sc. (8 sc)
Fasten off leaving 6” tail.
Weave tail through the stitches and cinch shut. Knot securely and fasten off. Weave in end.
Wrist Band (make 2):
This makes a short 1 1/2” wrist band. If you want to fold your wrist bands over you can start by chaining 15 instead.
Row 1: Leaving a 6″ tail, ch 8, hdc in 2nd ch from hook, hdc in each st across. (7)
Rows 2-22: ch 1, turn, working in 3rd loop of hdc from prev row, hdc in each st across. (7)
The band should measure 7” long by approximately 1 1/2″ wide and wrap comfortably around your wrist.
If you have larger wrists you may with to do a total of 24 row 2 repeats.
Fasten off leaving 15” tail for sewing band to mitten.
Sew ends of band together with 6” tail.
Sew band to top of mitten with 15″ tail.
Fasten off, weave in ends.
Want more gorgeous crochet patterns, and a little encouragement for your day? Sign up for my newsletter here! That way you’ll never miss out on special events, or freebies I’m offering.
JOIN ME ON SOCIAL MEDIA
I would love to see a picture when you’re done, so please feel free to come by my Facebook group and show off your finished project! Be sure to tag @kirstenhollowaydesigns when you share pictures of your project on Instagram!
You can also follow me on Facebook, Pinterest, Instagram, and Ravelry for more beautiful crochet patterns.
PATTERN TERMS AND CONDITIONS:
You are welcome to share the link to this pattern, using one image of your choice, on your site, but please do not share the written patterns themselves, this includes my Ravelry downloads or translations of these patterns, or use additional images. You do not have permission to use my images by themselves to create pinnable graphics for Pinterest, however they may be included in a roundup pin if there are 4 or more other patterns. If you sell finished items online, please do not use my pictures for your listings. I’m positive that your work is of high enough quality for you to sell the finished piece. Have confidence in your abilities! <3 Thank you!
This pattern was made to be used by individuals and small business crocheters alike. Selling your finished pieces in boutiques, at farmer’s markets, craft shows, and other local events is encouraged! Please credit/link Kirsten Holloway Designs when selling finished products online. The only thing I require is that this pattern not be used commercially to produce hundreds of thousands of copies. If you enjoyed this pattern or found it useful, why not share a link to this post with your friends?


Leave a Reply