
This slightly slouchy winter hat is lacy, yet still warm enough for cold weather. The crochet pattern uses easy stitches to provide a lace texture with flower petal details, and has a ribbed brim. The crochet instructions for this elegant slouchy hat come in 3 sizes: for women, kids and toddlers. Find the free crochet pattern instructions below, or purchase a print-optimized, ad-free PDF by clicking here.
Click here to add this pattern to your Ravelry queue!
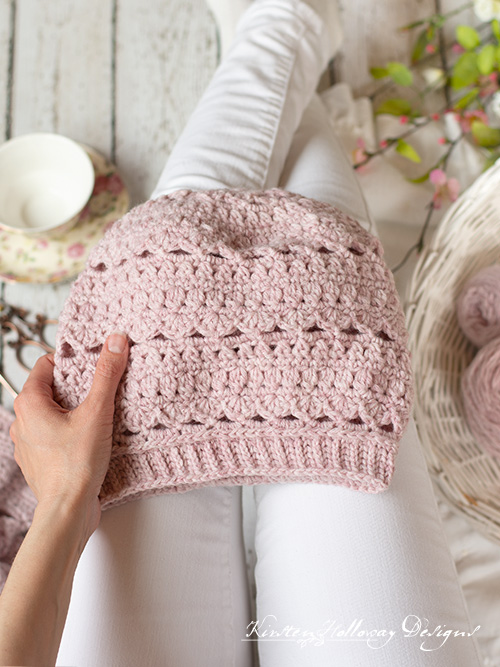
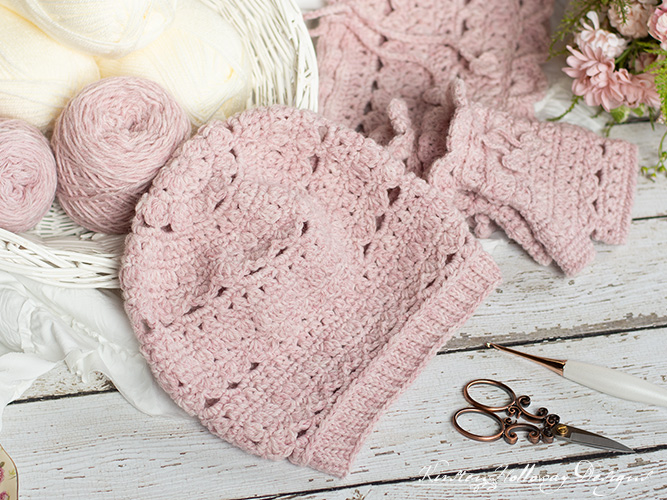
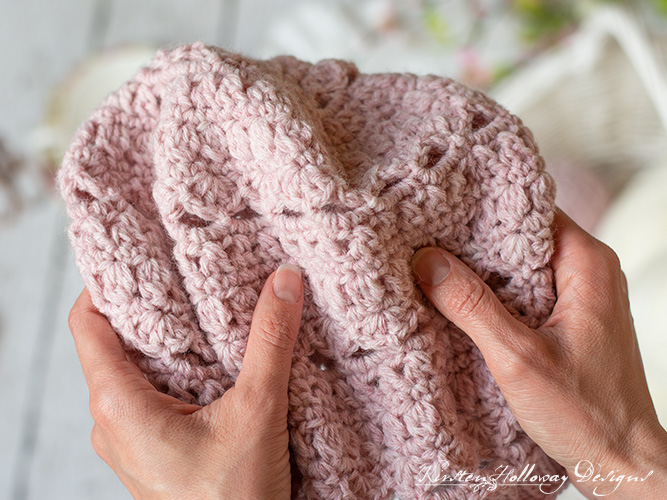
The Secret Garden slouch hat is the latest addition to the Secret Garden set. This lacy accessory combo is meant to keep you cute and cozy during cold weather. I used wool yarn to crochet this project, but you can use acrylic if you can’t wear wool. Caron Simply Soft would probably be pretty close to the thickness of the yarn I used–just be sure to meet gauge!
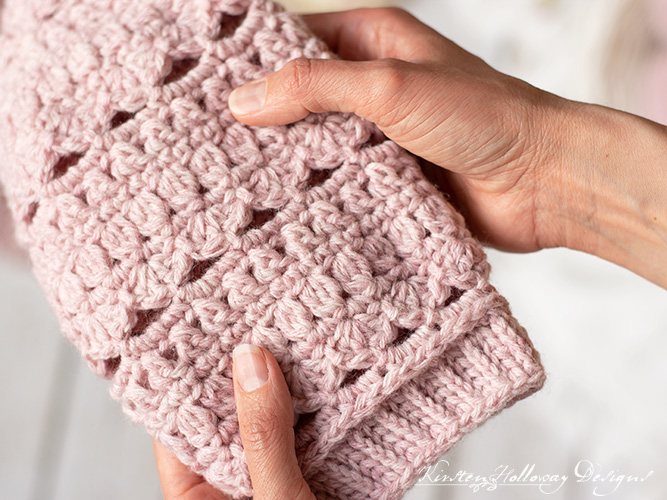
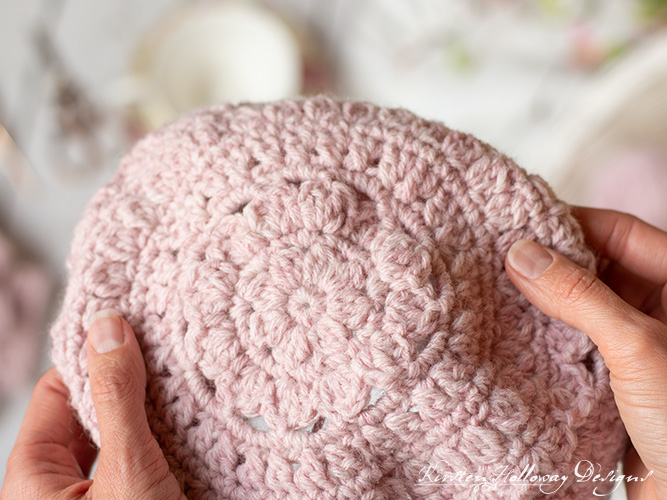
The stitches in the hat body are pretty flat, but this picture shows them off nicely. I used clusters, shells and cross stitches which are easy stitches even a beginner should know how to crochet.
The trickiest part of this hat pattern will be the cross stitch increases in round 7. Just follow the pattern notes so you don’t get off track, and all should go smoothly.
Make it a set with the matching accessories:
Disclaimer: This post contains affiliate links. When you purchase something using these links a small percentage of the sales price goes to me. However, you do not pay any extra for the item you purchase.
Difficulty:
Easy
Materials Needed:
180-210 yds Patons Classic Wool #4 Worsted weight yarn in “Natural Mix”, or “Blush”, or Lion Brand Wool-ease in “Blush Heather”
5mm (h) hook, or hook needed to obtain gauge
4.5mm hook for brim
Yarn needle
Scissors
Stitches Used:
sl st = slip stitch
ch = chain
sc = single crochet
dc = double crochet
FPsc = front post single crochet*
Additional Terms:
3dc cluster = dc3tog in same stitch.
Cross stitch = sk st, dc in next st, cross over st just made and dc in skipped st.
Cross Stitch Increase = dc in next unworked st, cross over st just made, dc in previous st.
Working in the 3rd Loop of hdc – Instructions: Look at the top of the stitch, and locate the sideways “V”, bend the stitch forward to look at the back and you should see another “V” made by the “yarn over”. You’ll be working into the back loop of that “V”. This is called the 3rd loop.
Center sc = Insert your hook through the center of the post instead of through the top two loops, and complete the stitch as you would a normal single crochet.
st/sts = stitch/stitches
sp/sps = space/spaces
Gauge:
5 1/2” across after round 7, 16 sc in 4”
Measurements:
Teen/Adult: 11” wide, by 10” tall
Child: 10” wide, by 8” tall
Toddler: 9” wide, by 7” tall
Additional Notes:
-ch 1 at beginning of round does not count as a stitch.
-Pattern is worked in multiples of 4
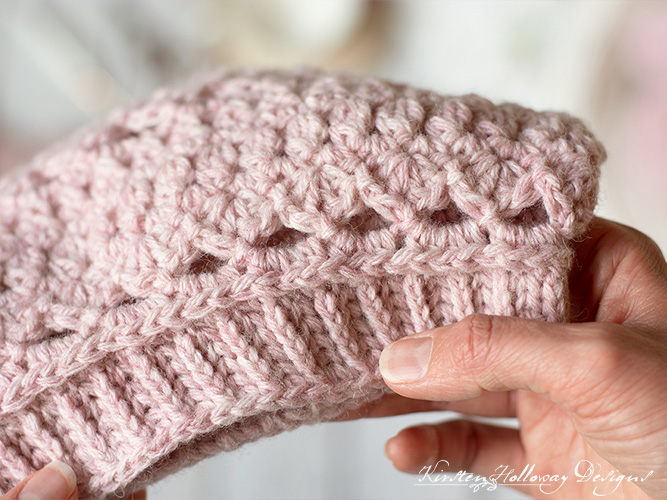
–*The FPsc stitches in the brim are worked through the front part of the stitch so the ribbing lays flatter. When you make a single crochet take note of the loop you pull up and the placement of the working yarn as you pull it through the 2 loops on your hook. You can work a post stitch around the loop you pulled up and your working yarn and your texture will be more subtle. It’s like doing a FP stitch around the front half the stitch. If done correctly it will create a line of upside down Vs which gives the band more of a knit look, especially when paired with a center single crochet in the next stitch. I’ve share a detailed picture tutorial on how to crochet this ribbed brim, over here.
Secret Garden Slouch Hat (US terms):
Click here to purchase an ad-free, print-optimized PDF of this pattern on LoveCrafts
Secret Garden Adult size hat:
With 5mm hook,
Round 1: 8 sc in magic circle, join with sl st to first sc. (8)
Round 2: ch 1, (3dc cluster, ch 1) in first st, *(3dc cluster, ch 1) in next st; repeat from * around, join with sl st to first 3dc cluster. (8 3dc clusters, 8 ch-1 sps)
Round 3: ch 1, *sc in top of 3dc cluster, 2 sc in ch-1 sp; repeat from * around, join with sl st to first sc. (24)
Round 4: *4 dc in first st, sl st in next st, *4 dc in next st, sl st in next st; repeat from * around, final sl st counts as join. (12 shells)
Your piece will pucker a bit and not lay flat after completing round 4. It will flatten out after the next round.
Round 5: sl st up the next 2 dc sts, sl st between 2nd and 3rd dc of shell, *ch 3, sl st between 2nd and 3rd dc of next shell; repeat from * around, final sl st counts as join. (12 ch-4 sps)
Round 6: ch 1, *4 sc in next ch-3 sp; repeat from * around, join with sl st to first sc. (48)
Round 7: ch 1, *work cross st across next 2 sts, cross stitch increase; repeat from * around, join with sl st to first dc. (64)
Round 8: ch 1, *2 sc in next st, sc in next 7 sts; repeat from * around, join with st st to first sc. (72)
Round 9: ch 1, *3dc cluster in next st, ch 1, sk st; repeat from * around, join with sl st to first 3dc cluster. (36 3dc clusters, 36 ch-1 sps)
Round 10: ch 1, *2 sc in next st, sc in next 5 sts; repeat from * around, join with sl st to first sc (84)
Round 11: *sk st, 4 dc in next st, sk st, sl st in next st; repeat from * around, final sl st counts as join. (21 shells)
Round 12: sl st up the next 2 dc sts, sl st between 2nd and 3rd dc of shell, *ch 4, sl st between 2nd and 3rd dc of next shell; repeat from * around, final sl st counts as join. (21 ch-4 sps)
Round 13: ch 1, *4 sc in ch-4 sp; repeat from * around, join with sl st to first sc. (84)
Round 14: ch 1, *work cross st across next 2 sts; repeat from * around, join with sl st to first dc. (84)
Round 15: ch 1, sc in each st around, join with sl st to first sc. (84)
Round 16: ch 1, *3dc cluster in next st, ch 1, sk st; repeat from * around, join with sl st to first 3dc cluster. (42 3dc clusters, 42 ch-1 sps)
Round 17: ch 1, 2 sc in each ch-1 sp around, join with sl st to first sc. (84)
Round 18: *sk st, 4 dc in next st, sk st, sl st in next st; repeat from * around, final sl st counts as join. (21 shells)
Repeat rounds 12-18 one more time
Your hat should be approximately 8 1/2” tall at this point.
Round 26: sl st up the next 2 dc sts, sl st between 2nd and 3rd dc of shell, *ch 3, sl st between 2nd and 3rd dc of next shell; repeat from * around, final sl st counts as join. (21 ch-3 sps)
Round 27: ch 1, 4 hdc in first ch-3 sp, *3 hdc in next ch-3 sp, 4 hdc in next ch-3 sp; repeat from * around, join with sl st to first hdc. (74)
Switch to 4.5mm hook,
Round 28: ch 1, working in 3rd loop of hdc, *sc2tog, sc in next 35 sts; repeat from * around, join with sl st to first sc. (72)
I used a special technique in the last few rounds to give the brim it’s knit look. I’d recommend you look at this post to see how to work these stitches if this is your first time crocheting this hat.
Rounds 29-33: ch 1, FPsc around first st, center sc in next st, *FPsc around next st, center sc in next st; repeat from * around, join with sl st to first FPsc. (72)
Fasten off, and weave in ends.
Secret Garden Child size hat:
With 5mm hook,
Round 1: 8 sc in magic circle, join with sl st to first sc. (8)
Round 2: ch 1, (3dc cluster, ch 1) in first st, *(3dc cluster, ch 1) in next st; repeat from * around, join with sl st to first 3dc cluster. (8 3dc clusters, 8 ch-1 sps)
Round 3: ch 1, *sc in top of 3dc cluster, 2 sc in ch-1 sp; repeat from * around, join with sl st to first sc. (24)
Round 4: *4 dc in first st, sl st in next st, *4 dc in next st, sl st in next st; repeat from * around, final sl st counts as join. (12 shells)
Your piece will pucker a bit and not lay flat after completing round 4. It will flatten out after the next round.
Round 5: sl st up the next 2 dc sts, sl st between 2nd and 3rd dc of shell, *ch 3, sl st between 2nd and 3rd dc of next shell; repeat from * around, final sl st counts as join. (12 ch-4 sps)
Round 6: ch 1, *4 sc in next ch-3 sp; repeat from * around, join with sl st to first sc. (48)
Round 7: ch 1, *work cross st across next 2 sts, cross stitch increase; repeat from * around, join with sl st to first dc. (64)
Round 8: ch 1, *2 sc in next st, sc in next 7 sts; repeat from * around, join with st st to first sc. (72)
Round 9: ch 1, *3dc cluster in next st, ch 1, sk st; repeat from * around, join with sl st to first 3dc cluster. (36 3dc clusters, 36 ch-1 sps)
Round 10: ch 1, *2 sc in next st, sc in next 17 sts; repeat from * around, join with sl st to first sc (76)
Round 11: *sk st, 4 dc in next st, sk st, sl st in next st; repeat from * around, final sl st counts as join. (19 shells)
Round 12: sl st up the next 2 dc sts, sl st between 2nd and 3rd dc of shell, *ch 4, sl st between 2nd and 3rd dc of next shell; repeat from * around, final sl st counts as join. (19 ch-4 sps)
Round 13: ch 1, *4 sc in ch-4 sp; repeat from * around, join with sl st to first sc. (76)
Round 14: ch 1, *work cross st across next 2 sts; repeat from * around, join with sl st to first dc. (76)
Round 15: ch 1, sc in each st around, join with sl st to first sc. (76)
Round 16: ch 1, *3dc cluster in next st, ch 1, sk st; repeat from * around, join with sl st to first 3dc cluster. (38 3dc clusters, 38 ch-1 sps)
Round 17: ch 1, 2 sc in each ch-1 sp around, join with sl st to first sc. (76)
Round 18: *sk st, 4 dc in next st, sk st, sl st in next st; repeat from * around, final sl st counts as join. (19 shells)
Round 19: sl st up the next 2 dc sts, sl st between 2nd and 3rd dc of shell, *ch 4, sl st between 2nd and 3rd dc of next shell; repeat from * around, final sl st counts as join. (19 ch-4 sps)
Round 20: ch 1, *4 sc in ch-4 sp; repeat from * around, join with sl st to first sc. (76)
Round 21: ch 1, *work cross st across next 2 sts; repeat from * around, join with sl st to first dc. (76)
Your hat should be about 7 1/4” tall at this point.
Round 22: ch 1, hdc2tog, hdc in next 9 sts, hdc2tog, hdc in next 8 sts; repeat from * around, join with sl st to first hdc. (68)
Switch to 4.5mm hook,
Round 23: ch 1, working in 3rd loop of hdc, sc in each st around, join with sl st to first sc. (68)
I used a special technique in the last few rounds to give the brim it’s knit look. I’d recommend you look at this post to see how to work these stitches if this is your first time crocheting this hat.
Rounds 24-28: ch 1, FPsc around first st, center sc in next st, *FPsc around next st, center sc in next st; repeat from * around, join with sl st to first FPsc. (68)
Fasten off, and weave in ends.
Secret Garden Toddler size hat:
With 5mm hook,
Round 1: 8 sc in magic circle, join with sl st to first sc. (8)
Round 2: ch 1, (3dc cluster, ch 1) in first st, *(3dc cluster, ch 1) in next st; repeat from * around, join with sl st to first sc. (8 3dc clusters, 8 ch-1 sps)
Round 3: ch 1, *sc in top of 3dc cluster, 2 sc in ch-1 sp; repeat from * around, join with sl st to first 3dc cluster. (24)
Round 4: *4 dc in first st, sl st in next st, *4 dc in next st, sl st in next st; repeat from * around, final sl st counts as join. (12 shells)
Your piece will pucker a bit and not lay flat after completing round 4. It will flatten out after the next round.
Round 5: sl st up the next 2 dc sts, sl st between 2nd and 3rd dc of shell, *ch 3, sl st between 2nd and 3rd dc of next shell; repeat from * around, final sl st counts as join. (12 ch-4 sps)
Round 6: ch 1, *4 sc in next ch-3 sp; repeat from * around, join with sl st to first sc. (48)
Round 7: ch 1, *work cross st across next 2 sts, cross stitch increase; repeat from * around, join with sl st to first dc. (64)
Round 8: ch 1, *2 sc in next st, sc in next 7 sts; repeat from * around, join with st st to first sc. (72)
Round 9: ch 1, *3dc cluster in next st, ch 1, sk st; repeat from * around, join with sl st to first 3dc cluster. (36 3dc clusters, 36 ch-1 sps)
Round 10: ch 1, *2 sc in next ch-1 sp; repeat from * around, join with sl st to first sc. (72)
Round 11: *sk st, 4 dc in next st, sk st, sl st in next st; repeat from * around, final sl st counts as join. (18 shells)
Round 12: sl st up the next 2 dc sts, sl st between 2nd and 3rd dc of shell, *ch 4, sl st between 2nd and 3rd dc of next shell; repeat from * around, final sl st counts as join. (18 ch-4 sps)
Round 13: ch 1, *4 sc in ch-4 sp; repeat from * around, join with sl st to first sc. (72)
Round 14: ch 1, *work cross st across next 2 sts; repeat from * around, join with sl st to first dc. (72)
Round 15: ch 1, sc in each st around, join with sl st to first sc. (72)
Round 16: ch 1, *3dc cluster in next st, ch 1, sk st; repeat from * around, join with sl st to first 3dc cluster. (36 3dc clusters, 36 ch-1 sps)
Round 17: ch 1, 2 sc in each ch-1 sp around, join with sl st to first sc. (72)
Round 18: *sk st, 4 dc in next st, sk st, sl st in next st; repeat from * around, final sl st counts as join. (18 shells)
Your hat should be about 6 1/4” tall at this point.
Round 19: sl st up the next 2 dc sts, sl st between 2nd and 3rd dc of shell, *ch 3, sl st between 2nd and 3rd dc of next shell; repeat from * around, final sl st counts as join. (18 ch-3 sps)
Round 20: ch 1, 4 hdc in first ch-3 sp, 4 hdc in next ch-3 sp, *3 hdc in next ch-3 sp, 4 hdc in next ch-3 sp; repeat from * around, join with sl st to first hdc. (64)
Switch to 4.5mm hook,
Round 21: ch 1, working in 3rd loop of hdc, sc in each st around, join with sl st to first sc. (64)
I used a special technique in the last few rounds to give the brim it’s knit look. I’d recommend you look at this post to see how to work these stitches if this is your first time crocheting this hat.
Rounds 22-26: ch 1, FPsc around first st, center sc in next st, *FPsc around next st, center sc in next st; repeat from * around, join with sl st to first FPsc. (64)
Fasten off, and weave in ends.
Want more gorgeous crochet patterns, and a little encouragement for your day? Sign up for my newsletter here! That way you’ll never miss out on special events, or freebies I’m offering.
JOIN ME ON SOCIAL MEDIA
I would love to see a picture when you’re done, so please feel free to come by my Facebook group and show off your project! Be sure to tag @kirstenhollowaydesigns when you share pictures of your finished hat on Instagram, and use #secretgardenslouch!
You can also follow me on Facebook, Pinterest, Instagram, and Ravelry for more beautiful crochet patterns.
PATTERN TERMS AND CONDITIONS:
You are welcome to share the link to this pattern, using one image of your choice, on your site, but please do not share the written patterns themselves, this includes my Ravelry downloads or translations of these patterns, or use additional images. You do not have permission to use my images by themselves to create pinnable graphics for Pinterest, however they may be included in a roundup pin if there are 4 or more other patterns. If you sell finished items online, please do not use my pictures for your listings. I’m positive that your work is of high enough quality for you to sell the finished piece. Have confidence in your abilities! <3 Thank you!
This pattern was made to be used by individuals, and small business crocheters alike. Selling your finished pieces in boutiques, at farmer’s markets, craft shows, and other local events is encouraged! Please credit/link Kirsten Holloway Designs when selling finished products online. The only thing I require is that this pattern not be used commercially to produce hundreds of thousands of copies.
If you enjoyed this pattern or found it useful, why not share a link to this post with your friends?


I’m frustrated. Child size round 11 says I will have 19 shells when done. I will have close to twice that. I’ve taken it out for 3 rows back. Everything seems ok to row 11 . Then I skip the 1 st stitch, * put 4 dc in next st, skip the next stitch , slip into the next stitch, skip the next one, repeat from *. Still come up with about 38 shells. What have I done wrong?
Hi Kim,
I’m sorry you are having trouble with this hat. Each shell in round 11 should only take up 4 stitches. If round 10 has 76 stitches, then 76÷4=19. Could you have increased too much in previous rounds?
I love this pattern but I’m trying to figure out how I would make a size for a 6 month old. I have fiddled with this for ages it seems but just want a matching hat with my daughter
Morgan,
The easiest way to do this would be to use a #3 light weight yarn and a 4mm hook and follow the toddler hat pattern. I have not personally tried this with this hat, but based on other hats I’ve done this with it should end up being pretty close. 🙂
I’m not getting that row of horizontal knit-looking stitches between rows 27 and 28 (adult size) that looks like what you normally get when stitching in the 3rd loop. Nothing I do is making a row that looks like that. Am I missing something?
If you are working into the 3rd loop at the back of thevstitch then it should push the top of the stitch to the outside of the hat giving that knit look. I just realized that language was missing in the adult size hat, but I’ve updated it to call for stitching in the 3rd loop in round 28. I hope that helps! 😊
I made this hat and love it! Beautiful pattern. I am about to start a second for a friends daughter. I had a question though, I’m finding the band tends to roll up on me, and I’m wondering if that’s just the nature of the stitch, or something wrong with my technique (I am relatively new to crocheting)? Thanks for any suggestions!
You can try blocking the band and see if that helps. 😊
Thank you. Beautiful designs as always.
laura
You’re welcome! I’m so happy you are loving this slouch hat pattern! 😊
I have frogged row 7 several times. I got the cross stitch, looks great. The INCR cross stitch has me baffled. Just not understanding and can’t find a tutorial on that one. Please help. 🙂
You’ll make the increase exactly like the regular cross-stitches, but you’re not going to be skipping a stitch before you start the next cross-stitch, meaning you dc in the next stitch immediately following the cross stitch you just finished, and then cross back over and dc in the previous stitch giving you 2 stitches in that stitch. Please feel free to come by my Facebook group and ask additional questions there. There are several ladies who have completed this pattern and can help you out further. 🙂 https://www.facebook.com/groups/KirstenHollowayDesigns
Got it!!! 😁
Awesome! I’m glad the info helped! 😁
Hi!!! I’m stuck on this row too!! I’ve followed the instructions and it yields waaaay too many, I get way more than the 64 stitches! Help!!
It sounds like you may be increasing too many times. Try taking a look at the cross stitch increase picture tutorial here at the bottom of this post https://kirstenhollowaydesigns.com/2021/08/secret-garden-square-free-crochet-pattern.html
Hopefully that helps!
How would I change the row numbers to make a fitted hat rather than a slouch?
Try following the size down from the previous you want to make and see if that works, then end the hat 3-4 rounds earlier than what’s written. You may also want to go up a hook size if the first suggestion doesn’t quite work.
I’m not following in round 10 how to go from 36 DC clusters (108st) and 36 ch1sp to 84 SC. Am I just ignoring the ch1sp and only going into the DC with the 2/5 SC?
You want to make sure that you are making 3dc clusters, not 3 separate dc stitches. A 3dc cluster will have only 1 stitch at the top. I hope that helps clear things up!
I am doing 3dc cluster, ch-1, sk st… and I’m getting 38 clusters instead of 36. I’ve done it a few times now, I have double checked my work, I have counted the previous stitches… I’m so confused! This pattern is so hard to follow 😭
Hi Kati,
I’m sorry you are having so many troubles understanding this pattern. While it is rated “easy” it is not a beginner-level project, so kudos for attempting this as your second project! Round 8 should end with 72 stitches, and if you work a cluster into every other stitch in round 9 you should end up with 36 clusters and 36 ch-1 sps (72/2=36). I hope that helps! You are welcome to apply to join my Facebook group where it’s easier to share pictures and get any future questions answered. 🙂
I am a little confused, please help me: Round 2: ch 1, (3dc cluster, ch 1) in first st, *(3dc cluster, ch 1) in next st; repeat from * around, join with sl st to first 3dc cluster. (8 3dc clusters, 8 ch-1 sps)
Round 3: ch 1, *sc in top of 3dc cluster, 2 sc in ch-1 sp; repeat from * around, join with sl st to first 3dc cluster. (24)
Round 4: *4 dc in first st, sl st in next st, *4 dc in next st, sl st in next st; repeat from * around, final sl st counts as join. (12 shells)
If you note, on round three you SC in the top of the top of the DC, and in the ch1 spaces around and you are suppose to sl st in the first 3DC cluster. Should you not state SL ST into the SC. and not into the 3DC cluster? Also you start Round 4 without a chain or anything. This makes a very messy start would you not start with a Chain 3 or something
Hi Kay,
The end of round 3 was supposed to say “joined with sl st to first sc”. I have fixed the typo. The shells in round 4 are started without any chains, the same way normal shell stitches usually are started. This gives them the petal appearance. 🙂 I hope that helps clear up the confusion!