Several months ago I was asked to crochet a 12″ square for a special wedding blanket the Red Heart Joy Creators were putting together (you can read more about the happy event and grab the other pattern links here). What could be more romantic than the French Provincial style? In my humble opinion, not much. With that in mind I quickly started playing around with textures incorporating those lovely neutral colors into an ornate, 12″ afghan square worthy of a fairy-tale. Find the free crochet pattern instructions below, or purchase a print-optimized, ad-free PDF by clicking here.
Click here to add this to your Ravelry queue!
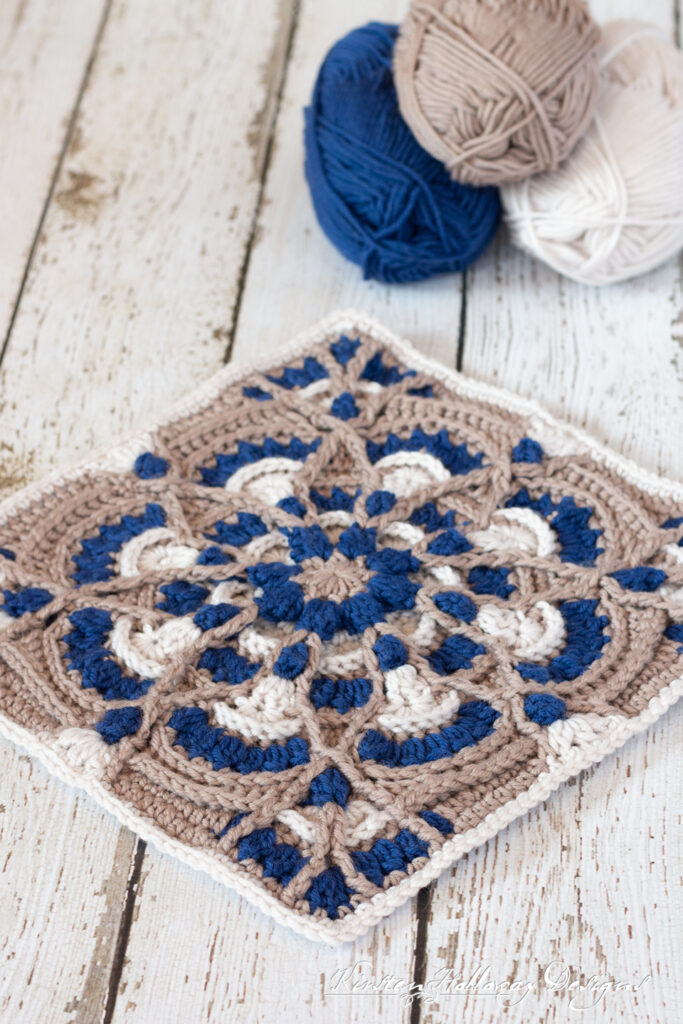
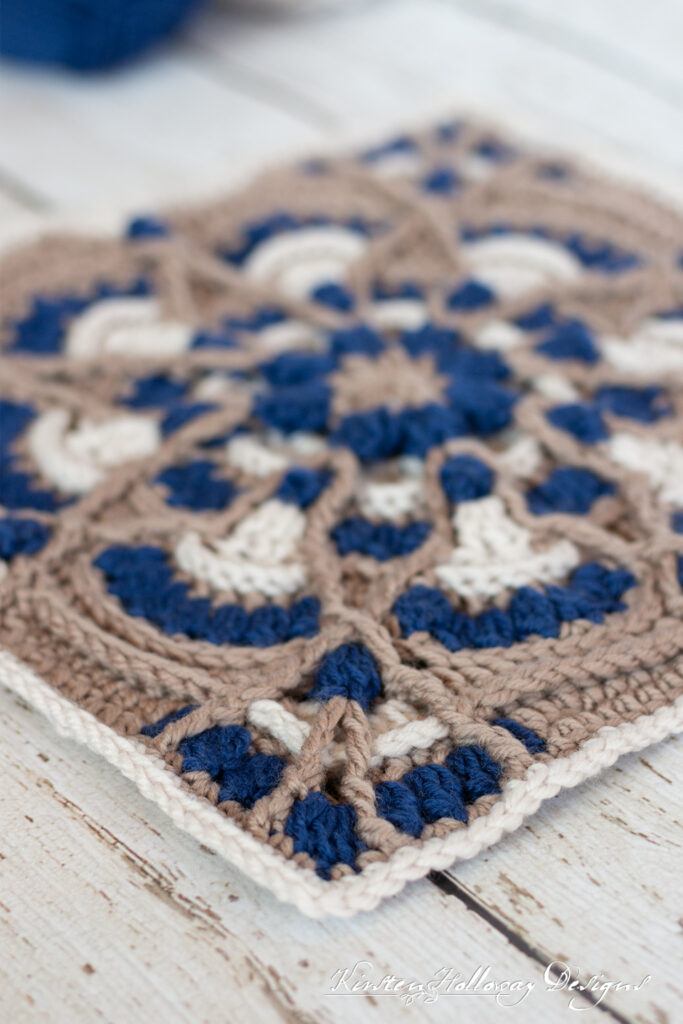
Those of you who follow me know how much I love texture. Why crochet row upon row of basic sc or dc stitches when you could use front post or back post stitches, popcorns, clusters, or shells?! This free 12″ afghan square crochet pattern is one of my most textured pieces to date–flowers, vines, trellises, ornate framework on mirrors and table legs–oh my! Incorporating this square into your next afghan or home décor project is guaranteed to take to the next level.
One of the reasons it was so easy to get carried away in a moment of luxury was because of the beautiful Chic Sheep yarn I was using. 100% merino wool means it slides smoothly over hands and hook, and is so squeezable and soft (this stuff is hard to put down, folks)! Disclaimer: The original yarn for this project was provided to me by Red Heart, but I would still the same things about it–it’s nice stuff! Some people have complained that this yarn gets full of static, but that’s easy to avoid if you don’t wind it into a cake on a ball winder, and pull only from the outside of the skein. Easy-peasy!
Knowing how to work post stitches, clusters, shells, and popcorn stitches will make this project go much more smoothly, but the amount of color changes could slow you down. Allow a bit of extra time to complete this project if you have not crocheted a piece with many color changes before. You’ll feel more relaxed and happy this way, which is the whole point of crochet!
So, let’s get started, shall we?
Difficulty:
Intermediate/Advanced
Materials Needed:
1 ball each #4 worsted weight Red Heart Chic Sheep yarn in Suede, VIP, and Linen
Uses approximately 120 yards Suede, 75 yards VIP, 50 yards Linen. If this yarn is no longer available in your area you may substitute with Caron Simply Soft in Bone, Dark Country Blue, and White
5.5mm hook, or hook needed to obtain gauge
Yarn needle
Scissors
Stitches Used:
ch = chain
sl st = slip stitch
sc = single crochet
hdc = half double crochet
dc = double crochet
tr = treble crochet
BPsc = back post single crochet
FPhdc = front post half double crochet
BPhdc = back post half double crochet
FPdc = front post double crochet
BPdc = back post double crochet
FPtr = front post treble crochet
Additional Terms:
2 dc cluster: dc2tog worked in same st
3 dc cluster: dc3tog worked in same st
Shell: 5 dc in same st
Large shell: 7 dc in same st
Popcorn st: 5 dc in same st, take hook out of last dc just worked and put it through top of first dc, grab loop from 5th dc and pull it through the first dc.
Gauge:
Measures 6” across after round 7
Measurements:
12” by 12” when blocked
Additional Notes:
-Mid-round color changes will be made by pulling a loop of the new color through the final 2 loops of a sc, dc, or tr st, or the last 3 loops of a hdc st. Color changes at the beginning of a new round can be done with a chainless starting method.
–This square has a lot of color changes. To cut down on the amount of ends I had to work in I carried my working yarn across the back of the square and worked over them in the next round if at all possible. I was able to hide most of my strings this way. I did cut my yarn for the VIP “buds” in round 13, the Linen “shells” in round 14, and the Linen “flowers” in round 17.
-If you have not done a lot of projects with a large number of color changes, and the color changes have you thoroughly confused, try making a solid colored square first.
-If you struggle with reading written crochet patterns this tutorial may help.
Perfectly Provincial Afghan Square (US Terms):
Click here to purchase an ad-free, print-optimized PDF of this pattern on LoveCrafts
OR
Pick up the printable version of this pattern on Etsy instead
With Suede yarn,
Round 1: ch 1, [2dc cluster, ch 1] 8 times in magic circle, join with sl st to ch-1. (8 2dc cluster, 8 ch-1 sps)
Join VIP, drop Suede and fasten off.
Round 2: ch 1, *popcorn st in ch-1 sp, ch 2; repeat from * around, join with sl st to first popcorn st. (8 popcorn sts, 8 ch-2 sps)
Join Linen, drop VIP and fasten off.
Round 3: ch 1, 3 sc in first ch-2 sp, *3 sc in next ch-2 sp; repeat from * around, join with sl st to first sc. (24 sc)
Round 4: ch 1, 2 sc in first st, sc in next 2 sts, *2 sc in next st, sc in next 2 sts; repeat from * around, join with sl st to first sc. (32 sc)
In the following round the dip between each shell should line up perfectly with the point of each popcorn st. If it does not you will need to rip the last round out and restitch it so that it does.
Round 5: ch 1, sc in same st as join, *sk st, shell in next st, sk st, sc in next st; repeat from * around omitting sc in final repeat, join with sl st to first sc. (8 shells)
Drop Linen, and fasten off.
Round 6: with Suede: chainless starting *tr in center top of popcorn st from round 2 (this will be the 3rd dc out of 5 from the popcorn st), join VIP: ch 1, popcorn st in sc between shells from prev round, pick up Suede: ch 1, tr in same st where you worked prev treble, BPhdc around next 5 dc, ch 1; repeat from * around, join with sl st to first tr. (16 tr, 40 BPhdc, 8 popcorn sts)
Round 7: with Suede: ch 1, *FPdc around tr from prev round, with Linen: 3 dc in ch-1 (located behind popcorn st), with Suede: FPdc around next tr, sk st, with VIP: (3dc cluster, ch 1) in next 2 sts, 3dc cluster in the next st, sk st; repeat from *around, join with sl st to first FPdc. (24 3dc clusters, 24 dc, 16 FPdc, 16 ch-1 sps)
Drop VIP, and Fasten off.
Round 8: with Suede: ch 1, *FPhdc around FPdc from prev round, with Linen: FPhdc around next 3 dc sts, with Suede: FPhdc around FPdc from prev round, sc between FPdc and 3dc cluster, 2 sc in next 2 ch-1 sps, sc between 3dc cluster and FPdc; repeat from * around. Join with sl st to first FPhdc. (40 FPhdc, 48 sc)
Your piece may be rippling a bit at this point but will flatten out soon.
Round 9: *with Linen: sk 2 sts, large shell in next st (will be center of the row of 5 FPhdc sts you made in prev round), sk 2 sts, with Suede: BPsc around next 6 sts; repeat from * around, join with sl st to first dc of first shell. (8 large shells, 48 BPsc)
Drop Linen, and fasten off.
Round 10: ch 1, *BPhdc around next 7 sts, sc in next 6 BPsc; repeat from * around, join with sl st to first BPhdc. (48 sc, 56 BPhdc)
Round 11: ch 1, *FPtr around FPhdc from round 8, join VIP: (3dc cluster, ch 1) in each of next 6 sts, 3dc cluster in the next st, with Suede: FPtr around FPhdc from round 8, sk 2 sts, hdc in next 2 sts, sk 2 sts; repeat from * around, join with sl st to first FPtr. (56 3dc clusters, 16 FPtr, 16 hdc, 48 ch-1 sps)
Drop VIP, and fasten off.
Round 12: with Suede: ch 1, *sc between FPtr and 3dc cluster st, 2 sc in each of next 6 ch-1 sps, sc between 3dc cluster and FPtr, dc2tog around next 2 FPtr sts; repeat from * around, join with sl st to first sc. (112 sc, 8 dc2tog)
For this round you will join the VIP color for each popcorn stitch and cut it after completing the stitch. You should leave ends long enough to weave in securely. For an extra measure of security I knotted my ends together before weaving them in.
Round 13: ch 1, *sk 2 sts, BPhdc around next 10 sc sts, sk 2 sts, FPtr around second leg of dc2tog, join VIP, ch 1, popcorn in top of dc2tog, fasten off VIP. With Suede: ch 1, FPtr around first leg of dc2tog (note: you should be crossing your FPtr stitches. This will make what looks like a tight V under the popcorn); repeat from * around, join with sl st to first BPhdc. (80 BPhdc, 16 FPtr, 8 popcorn st)
Round 14: ch 1, *FPdc around next 3 BPhdc sts, FPhdc around next 7 FPhdc sts, FPdc around FPtr, sc in ch-1 sp, ch 1, sk popcorn st, sc in next ch-1 sp, FPdc around FPtr, FPhdc around next 7 BPhdc sts, FPdc around next 3 BPhdc sts, FPtr around FPtr, with Linen: 8 dc in ch-1 behind popcorn st, with Suede: FPtr around FPtr; repeat from * around, join with sl st to first FPdc. Drop Linen and fasten off. (8 FPtr, 32 FPdc, 56 FPhdc, 24 FPdc, 32 dc, 8 sc, 4 ch-1 sps)
Round 15: ch 1, * BPhdc around next 4 sts, BPsc around next 6 sts, sc in next 5 sts, BPsc around next 6 sts, BPhdc around next 4 sts, FPdc around FPtr, BPhdc around next 4 sts, tr in center top of popcorn st from prev round, ch 2, tr in same st as last tr made, BPhdc around next 4 sts, FPdc around FPtr; repeat from * around, join with sl st to first BPsc. (48 BPsc, 64 BPhdc, 8 tr, 20 sc, 4 ch-2 sps, 4 ch-2 sps)
Round 16: join VIP: ch 1, *3dc cluster in st immediately following FPdc, with Suede: dc in next st, hdc in next 2 sts, sc in next 17 sts, hdc in next 2 sts, dc in next st, with VIP: [3dc cluster in next st, ch 1, sk st] 3 times, 3dc cluster in the next st, with Suede: FPdc around tr from prev round, with VIP (Linen also makes a nice variation here): 4 dc in ch-2 sp, with Suede: FPdc around tr, with VIP: [(3 dc cluster in next st, ch 1, sk st)] 2 times, 3dc cluster, ch 1, in next st; repeat from * around, join with sl st to first 3 dc cluster. (68 sc, 32 3dc cluster, 24 dc, 12 hdc, 8 FPdc)
Drop VIP and fasten off
Round 17: with Suede: ch 1, *FPtr around FPdc from round 16, sc in 3dc cluster, hdc in next 8 sts, FPdc around FPdc from round 15, with Linen: ([2dc cluster, ch 1] 2 times, 2dc cluster) in ch-1 behind popcorn st in round 13, sk 7 sts on current row, with Suede: FPdc around FPdc from round 16, hdc in next 8 sts, sc in 3dc cluster, FPtr around FPdc from round 15, sc in ch-1 sp, 2 sc in each of the next 2 ch-1 sps, FPdc around FPdc from prev round, sc in next 2 sts, ch 1, sc in next 2 sts, FPdc around FPdc, 2 sc in each of the next 2 ch-1 sps, sc in next ch-1 sp; repeat from * around, join with sl st to first FPtr. (8 FPtr, 64 sc, 64 hdc, 16 FPdc, 12 2dc clusters, 12 ch-1 sps)
Drop Suede, and fasten off.
Round 18: with Linen: ch 1, sc in next 11 sts, *sc between FPdc and 2dc cluster, 2 sc in next 2 ch-1 sps, sc between 2dc cluster and FPdc (note: you should be able to work the sc into the ch-2 sps, AND the sc sts you skipped in the prev round joining them together. You should have 6 sc sts across this section instead of the 7 you skipped in the prev round, but if you skip the first st, working into the remaining sts is pretty easy), sc in next 18 sts, 3 sc in ch-1 sp in corner, sc in next 19 sts; repeat from * around, join with sl st to first sc. (46 sts/side 184 total)
Fasten off and weave in ends.
Block for best results.
If you liked this project, here are some other 12-inch squares you might also enjoy:
Want more gorgeous crochet patterns, and a little encouragement for your day? Sign up for my newsletter here! That way you’ll never miss out on special events, or freebies I’m offering.
JOIN ME ON SOCIAL MEDIA
I would love to see a picture when you’re done, so please feel free to come by my Facebook group and show off your project! Be sure to tag @kirstenhollowaydesigns when you share pictures of your finished square on Instagram, and use #perfectlyprovincialsquare!
You can also follow me on Facebook, Pinterest, Instagram, and Ravelry for more beautiful crochet patterns.
PATTERN TERMS AND CONDITIONS:
You are welcome to share the link to this pattern, using one image of your choice, on your site, but please do not share the written patterns themselves, this includes my Ravelry downloads or translations of these patterns, or use additional images. You do not have permission to use my images by themselves to create pinnable graphics for Pinterest, however they may be included in a roundup pin if there are 4 or more other patterns. If you sell finished items online, please do not use my pictures for your listings. I’m positive that your work is of high enough quality for you to sell the finished piece. Have confidence in your abilities! <3 Thank you!
This pattern was made to be used by individuals, and small business crocheters alike. Selling your finished pieces in boutiques, at farmer’s markets, craft shows, and other local events is encouraged! Please credit/link Kirsten Holloway Designs when selling finished products online. The only thing I require is that this pattern not be used commercially to produce hundreds of thousands of copies.
If you enjoyed this pattern or found it useful, why not share a link to this post with your friends?


Please explain round #6:
Do you mean the joinings of Suede & VIP are at 2 different location? The Suede @ the center top of popcorn st from round #2; and the VIP @ the sc between shells from round #5?
You’ll start with Suede then pull the VIP through the last two loops of the previous stitch when it calls for joining the new color. I carry my colors while stitching the round and work over the one I’m not using instead of fastening off each time. There are lots and lots of color changes in this pattern! Read the Additional Notes for more details on how the color changes are supposed to take place. 😊
would like to know what is a starting chainless treble, havent heard of this before and cant seem
to find any instructions for it. if it is chainless, rather difficult to understand this.
Try watching this video: https://www.youtube.com/watch?v=P5FXJqfJvtE&feature=emb_logo You can also do the standing treble crochet method if you’re more familiar with it. 🙂
Thank you for sharing! Very beautiful!
Could you please explain what sk stitch mean? I’m doing it right now and a little confused. Is it sleet stitch? Rounds 6 and 7 for example.
Thanks a lot.
Sk stands for “skip”. 😊 You will skip the stitch or stitches the pattern tells you to then.
Absolutely stunning! Thank you so much for this amazing pattern.
You’re most welcome, Linda! ????
This is a beautiful square. I plan on doing it will #3 thread and a 1.65 thread for a baby blanket for my sister. Thank you so much for your creativity. After this I may try my and at creating a square on my own, any advice?
Have fun! I think they will be beautiful!
If you want to start designing your own squares imagine shapes and textures you think look nice together, then try them out until they make something you love. It usually takes me several attempts to get something I love, but that’s part of what is so fun about creating!
Thank you, for sharing. I am newish to crochet and love searching for and admiring beautiful pieces like this one; whether I am going to make it or not! This really is very nice!!!
You’re welcome, Kimberly! I’m so glad it could inspire you!
I plan to make this as a pillow in Christmas colors of Red, Green and White. A pair of decorative pillows for my sofa, for the holidays, is just the treat for this lovely square!
Thank you!
You’re welcome! Have fun!
Very beautiful- would like to see a video for this and your other fine works. Since I don’t follow patterns to well, a video would be most helpful. The square is beautiful. I would love to make one. Please consider making videos for your work
Hi Nancy,
At this point I do not have the setup, space or time to produce videos. I hope to change that in the future though! Glad you like the square. 🙂
Thanks so much for sharing this lovely piece of work SMILE
You’re very welcome, Helen! I’m glad you like it! ????
No video for this square?
No, not at this point.
Such a pretty square, thank you for sharing.
You’re very welcome, Cat!