This classic crochet baby blanket pattern is a vintage yet modern accessory for any nursery. It comes in several sizes for babies, and includes 2 throw sizes. Find the free crochet pattern instructions below, or purchase a print-optimized, ad-free PDF by clicking here.
Click here to add this to your Ravelry queue!
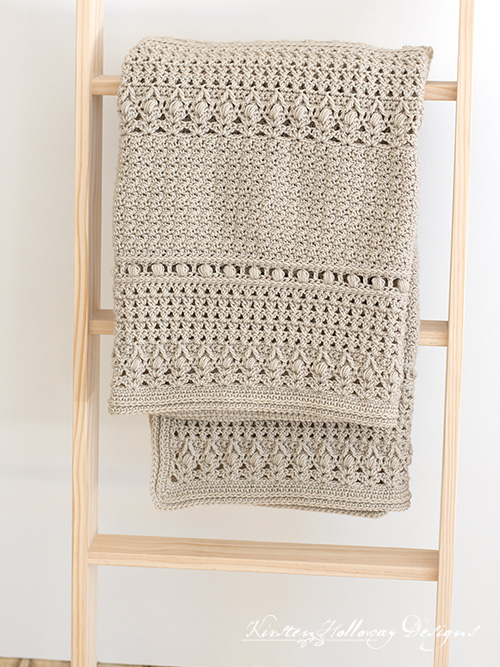
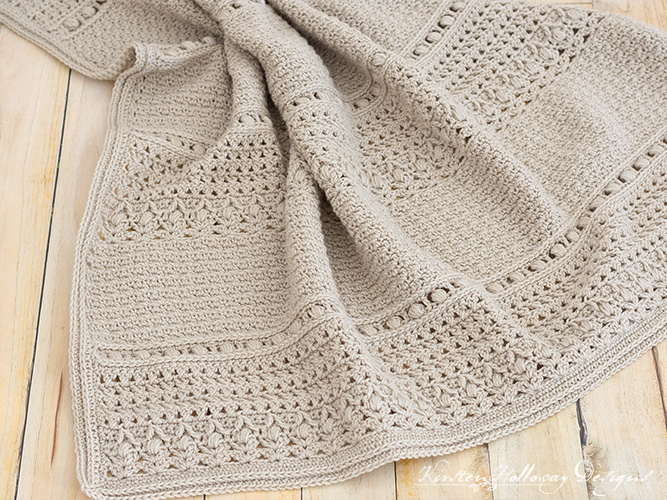
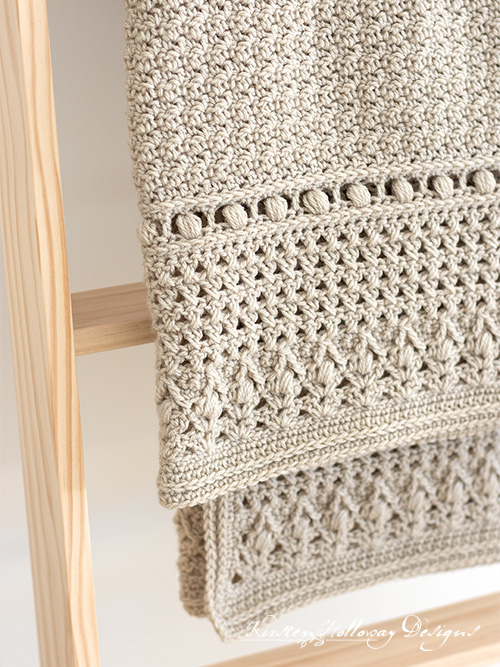
This blanket uses post stitches, shells, puff stitches and cross stitches to create a perfectly vintage-style texture that is elegant and interesting. I kept the border simple so as not to detract from the beauty of the stitches, but if you have a different trim that you’d prefer to use, that’s fine too.
In order to keep the design at the ends of the blanket the same, this project is crocheted in 2 pieces and then sewn together. This also makes it easy to customize! Almost every size is just a little different, but I’ve tried to write the crochet patterns so that the ends of the blanket are easily distinguishable from the middle section or sections. The most import thing to remember is to keep both pieces of the blanket facing the same direction (front side up, or back side up) when sewing them together after making the 2 different panels. The ribbed texture should only show up on one side.
I have used Bernat Baby Sport yarn to crochet this blanket since it is easy to work with and easy to care for (which is always important for baby blankets and accessories). It is soft and comes in large skeins which are prefect for crocheting blankets with!
Want to make a layette set? Here are a couple of matching crochet patterns:
Disclaimer: This post contains affiliate links. When you purchase something using these links a small percentage of the sales price goes to me. However, you do not pay any extra for the item you purchase.
Difficulty:
Easy/Intermediate
Techniques used: post stitches, puff stitches, cross stitches, half-double crochet in the 3rd loop.
Materials Needed:
2000, 2250, 2500, 3750, 5400 yards #3 light weight Bernat Baby Sport in “Baby Taupe”
5.5mm (I) hook, or hook needed to obtain gauge
Scissors
Yarn needle
Stitches Used:
ch = chain
sl st = slip stitch
sc = single crochet
hdc = half double crochet
dc = double crochet
FPsc = front post single crochet
FPtr2tog = front post treble crochet 2 together
hdc2tog = half double crochet 2 together
RS = right side
WS = wrong side
st/sts = stitch/stitches
sp/sps = space/spaces
prev = previous
Additional Terms:
Working in the 3rd loop of hdc: Look at the top of the stitch, and locate the sideways “V”, bend the stitch to look at the back, and you should see another “V”. You’ll be working into the back loop of that “V”, this is called the 3rd loop.
Seed Stitch: alternate sc and dc stitches across the designated row, then on the next row work a dc stitch in the sc stitch from the previous row, and a sc stitch in the dc stitch from the previous row.
Hdc puff st: YO, pull up a stitch 5 times, pull through 10 loops on hook, YO, pull through final 2 loops.
Cross st: sk st, dc in next st, cross over st just made, dc in skipped st.
Shell: 4 dc in same st
Gauge:
13 sts using the seed stitch pattern in 4″. Each row 2-34 repeat measures approximately 12″ tall before blocking.
Measurements:
(These are approximate dimensions)
Receiving Blanket: 40″ by 40″
Crib Blanket: 36 x 50″
Toddler Blanket: 40″ x 50
Small Throw: 50″ x 60″
Large Throw: 60″ x 72″
Additional Notes:
-Ch 1 at beginning of new row does not count as a stitch.
-Ch-2 and ch-3 at beginning of a new row do count as stitches. You may replace the ch-2 with a hdc, and the ch-3 with a dc if you prefer. Ch-1 to turn if you decide to make that substitution.
-This blanket is worked in 2 separate pieces and then sewed together so that the pattern on both ends of the blanket is the same.
–This blanket will require some blocking to even out the side edges.
-This pattern is easily adjustable! It is worked in multiples of 4 + 6, + 1, plus 1 more for the turning chain.
–You could turn this blanket into a poncho! Decide if you want a 36”, 40” or 50” wide poncho (See “Measurements” section to see which size blanket pattern you should start). Make two panels following rows 1-34, then 2-33 for each panel. Sew the two panels together leaving space for a head hole in the middle of the row. Row 1 on both panels will be the bottom of your poncho. Work a trim of your choice around the entire poncho (or follow the blanket’s trim). Block to finish.
Modern Classic Baby Blanket Pattern (US Terms):
Click here to purchase an ad-free, print-optimized PDF of this pattern on LoveCrafts
OR
Pick up the printable version of this pattern on Etsy instead
Crochet a Receiving Blanket:
Ends:
Ch 132,
Row 1 (RS): sc in second ch from hook, sc in each remaining st of row, ch 3 (counts as first dc of row 2), turn. (131)
Row 2 (WS): sk 2 sts, shell in next st, *sk 3 sts, shell in next st; repeat from * across, when there are 3 sts left in row, sk 2 sts, dc in final st, ch 3 (counts as first dc of row 3), turn. (32 shells, 2 dc)
Row 3 (RS): sk 2 sts, shell between 2nd and 3rd dc of shell from prev row, *sk 4 sts, shell between 2nd and 3rd dc of shell from prev row; repeat from * across, when there are 3 sts left in row, sk 2 sts, dc in top of ch 3, ch 2 (counts as first hdc of row 4), turn. (32 shells, 2 dc)
Row 4 (WS): hdc in next st, *ch 1, sk st, hdc puff st between 2nd and 3rd dc of shell from prev row, ch 1, sk st, hdc in next 2 sts; repeat from * across (note: final hdc will be worked in top of ch-3 from prev row), ch 1, turn. (32 hdc puff sts, 66 hdc)
Row 5 (RS): *sc in next 2 hdc sts, sc in ch-1 sp, sk puff st, sc in ch-1 sp; repeat from * across putting 2 sc in final st of row, ch 1, turn. (131)
Row 6 (WS): sc in each st across, ch 1, turn. (131)
You will now be working on 2 different rows. Your sc sts will be worked on row 7 as normal sts, and your FPtr2tog sts will be worked around the hdc sts you made in row 4. They should form peaks over top of the hdc puff sts. Remember to skip a stitch when you start making the sc sts again-the FPtr2tog counts as a st so you need to make room for it!
Row 7 (RS): sc in next 3 sts, *FPtr2tog placing first leg around hdc next to first puff st from row 4, place second leg around next hdc on other side of puff st from row 4, sc in next 3 sts; repeat from * across, ch 3 (counts as first dc of row 8), turn. (32 FPtr2tog, 99 sc)
Row 8 (WS): [Cross st across next 2 sts] 64 times, sk st, dc in final st of row, ch 3 (counts as first dc of row 9), turn. (130)
Row 9 (RS): [Cross st across next 2 sts] 64 times, dc in top of ch 3, ch 3 (counts as first dc of row 10), turn. (130)
Repeat row 9 3 more times, on final repeat ch 1 to turn.
Row 13 (RS): sc in each st across, 2 sc in final st of row, ch 1, turn. (131)
Row 14 (WS): FPsc in each st across, ch 2 (counts as first hdc of next row), turn. (131)
Row 15 (RS): hdc in next st, *ch 1, sk st, hdc puff st in next st, ch 1, sk st, hdc in next st; repeat from * across, put hdc in final st of row. (32 hdc puff st, 35 hdc)
*Fasten off*
Working on right side,
Attach yarn to top of ch-2 from prev row,
Row 16 (RS): ch 1, sc in next 2 hdc sts, *sc in ch-1 sp, sc in puff st, sc in ch-1 sp, sc in hdc; repeat from * across, sc in final st of row, ch 1, turn. (131)
Row 17 (WS): FPsc in each st across, ch 1, turn. (131)
Row 18 (RS): sc in first st, dc in next st, *sc in next st, dc in next st; repeat from * across, sc in final st, ch 1, turn. (131)
Row 19 (WS): dc in first st, sc in next st, *dc in next st, sc in next st; repeat from * across, dc in final st, turn. (131)
Repeat rows 18 and 19 7 more times.
Row 34 (RS): sc in each st across ch 1, turn. (131)
Repeat rows 2-33.
Fasten off, weave in ends.
Make second end panel following rows 1-34, then repeat rows 2-17.
Fasten off, and weave in ends.
Sewing the panels together:
Make sure both panels are facing the same way, either front side up or back side up. Row 1 on both panels should be at the very outside ends. Sew panels together with whip stitch, then begin trim (see bottom of page).
Crochet a Crib Blanket (or Toddler) Blanket:
(Note: Crib blanket stitch counts are first, toddler blanket stitch counts are in parentheses/brackets)
Ends:
Ch 116, (132),
Row 1 (RS): sc in second ch from hook, sc in each remaining st of row, ch 3 (counts as first dc of row 2), turn. (115 [131])
Row 2 (WS): sk 2 sts, shell in next st, *sk 3 sts, shell in next st; repeat from * across, when there are 3 sts left in row, sk 2 sts, dc in final st, ch 3 (counts as first dc of row 3), turn. (28 [32] shells, 2 dc)
Row 3 (RS): sk 2 sts, shell between 2nd and 3rd dc of shell from prev row, *sk 4 sts, shell between 2nd and 3rd dc of shell from prev row; repeat from * across, when there are 3 sts left in row, sk 2 sts, dc in top of ch 3, ch 2 (counts as first hdc of row 4), turn. (28 [32] shells, 2 dc)
Row 4 (WS): hdc in next st, *ch 1, sk st, hdc puff st between 2nd and 3rd dc of shell from prev row, ch 1, sk st, hdc in next 2 sts; repeat from * across (note: final hdc will be worked in top of ch-3 from prev row), ch 1, turn. (28 [32] hdc puff sts, 58 [66] hdc)
Row 5 (RS): *sc in next 2 hdc sts, sc in ch-1 sp, sk puff st, sc in ch-1 sp; repeat from * across putting 2 sc in final st of row, ch 1, turn. (115 [131])
Row 6 (WS): sc in each st across, ch 1, turn. (115 [131])
You will now be working on 2 different rows. Your sc sts will be worked on row 7 as normal sts, and your FPtr2tog sts will be worked around the hdc sts you made in row 4. They should form peaks over top of the hdc puff sts. Remember to skip a stitch when you start making the sc sts again-the FPtr2tog counts as a st so you need to make room for it!
Row 7 (RS): sc in next 3 sts, *FPtr2tog placing first leg around hdc next to first puff st from row 4, place second leg around next hdc on other side of puff st from row 4, sc in next 3 sts; repeat from * across, ch 3 (counts as first dc of row 8), turn. (28 [32] FPtr2tog, 87 [99] sc)
Row 8 (WS): [Cross st across next 2 sts] 56 [64] times, sk st, dc in final st of row, ch 3 (counts as first dc of row 9), turn. (114 [130])
Row 9 (RS): [Cross st across next 2 sts] 56 (64) times, dc in top of ch 3, ch 3 (counts as first dc of next row), turn. (114 [130])
Repeat row 9 3 more times, on final repeat ch 1 to turn.
Row 13 (RS): sc in each st across, 2 sc in final st of row, ch 1, turn. (115 [131])
Row 14 (WS): FPsc in each st across, ch 2 (counts as first hdc of next row), turn. (115 [131])
Row 15 (RS): hdc in next st, *ch 1, sk st, hdc puff st in next st, ch 1, sk st, hdc in next st; repeat from * across, put hdc in final st of row. (28 [32] hdc puff st, 31 [35] hdc)
*Fasten off*
Working on right side,
Attach yarn to top of ch-2 from prev row,
Row 16 (RS): ch 1, sc in next 2 hdc sts, *sc in ch-1 sp, sc in puff st, sc in ch-1 sp, sc in hdc; repeat from * across, sc in final st of row, ch 1, turn. (115 [131])
Row 17 (WS): FPsc in each st across, ch 1, turn. (115 [131])
Row 18 (RS): sc in first st, dc in next st, *sc in next st, dc in next st; repeat from * across, sc in final st, ch 1, turn. (115 [131])
Row 19 (WS): dc in first st, sc in next st, *dc in next st, sc in next st; repeat from * across, dc in final st, turn. (115 [131])
Repeat rows 18 and 19 7 more times.
Row 34 (RS): sc in each st across ch 1, turn. (115 [131])
Repeat rows 2-34
Middle section:
Row 68 (WS): FPsc in each st across, ch 2 (counts as first hdc of next row), turn. (115 [131])
Row 69 (RS): hdc in next st, *ch 1, sk st, hdc puff st in next st, ch 1, sk st, hdc in next st; repeat from * across, put hdc in final st of row. (28 [32] hdc puff st, 31 [35] hdc)
*Fasten off*
Working on right side,
Attach yarn to top of ch-2 from prev row,
Row 70 (RS): ch 1, sc in next 2 hdc sts, *sc in ch-1 sp, sc in puff st, sc in ch-1 sp, sc in hdc; repeat from * across, sc in final st of row, ch 1, turn. (115 [131])
Row 71 (WS): FPsc in each st across, ch 1, turn. (115 [131])
Fasten off, and weave in ends.
For Crib and Toddler blanket, make a second end panel following rows 1-67.
Fasten off, and weave in ends.
Sewing the panels together:
Make sure both panels are positioned the same way, either front side up or back side up. Row 1 on both panels should be at the very outside ends. Sew panels together with whip stitch, then begin trim (see bottom of page).
Crochet Small Throw Blanket:
Ends:
Ch 164,
Row 1 (RS): sc in second ch from hook, sc in each remaining st of row, ch 3 (counts as first dc of row 2), turn. (163)
Row 2 (WS): sk 2 sts, shell in next st, *sk 3 sts, shell in next st; repeat from * across, when there are 3 sts left in row, sk 2 sts, dc in final st, ch 3 (counts as first dc of row 3), turn. (40 shells, 2 dc)
Row 3 (RS): sk 2 sts, shell between 2nd and 3rd dc of shell from prev row, *sk 4 sts, shell between 2nd and 3rd dc of shell from prev row; repeat from * across, when there are 3 sts left in row, sk 2 sts, dc in top of ch 3, ch 2 (counts as first hdc of row 4), turn. (40 shells, 2 dc)
Row 4 (WS): hdc in next st, *ch 1, sk st, hdc puff st between 2nd and 3rd dc of shell from prev row, ch 1, sk st, hdc in next 2 sts; repeat from * across (note: final hdc will be worked in top of ch-3 from prev row), ch 1, turn. (40 hdc puff sts, 82 hdc)
Row 5 (RS): *sc in next 2 hdc sts, sc in ch-1 sp, sk puff st, sc in ch-1 sp; repeat from * across putting 2 sc in final st of row, ch 1, turn. (163)
Row 6 (WS): sc in each st across, ch 1, turn. (163)
You will now be working on 2 different rows. Your sc sts will be worked on row 7 as normal sts, and your FPtr2tog sts will be worked around the hdc sts you made in row 4. They should form peaks over top of the hdc puff sts. Remember to skip a stitch when you start making the sc sts again-the FPtr2tog counts as a st so you need to make room for it!
Row 7 (RS): sc in next 3 sts, *FPtr2tog placing first leg around hdc next to first puff st from row 4, place second leg around next hdc on other side of puff st from row 4, sc in next 3 sts; repeat from * across, ch 3 (counts as first dc of row 8), turn. (40 FPtr2tog, 120 sc)
Row 8 (WS): [Cross st across next 2 sts] 80 times, sk st, dc in final st of row, ch 3 (counts as first dc of row 9), turn. (162)
Row 9 (RS): [Cross st across next 2 sts] 80 times, dc in top of ch 3, ch 3 (counts as first dc of next row), turn. (162)
Repeat row 9 3 more times, on final repeat ch 1 to turn.
Row 13 (RS): sc in each st across, 2 sc in final st of row, ch 1, turn. (163)
Row 14 (WS): FPsc in each st across, ch 2 (counts as first hdc of next row), turn. (163)
Row 15 (RS): hdc in next st, *ch 1, sk st, hdc puff st in next st, ch 1, sk st, hdc in next st; repeat from * across, put hdc in final st of row. (40 hdc puff st, 43 hdc)
*Fasten off*
Working on right side,
Attach yarn to top of ch-2 from prev row,
Row 16 (RS): ch 1, sc in next 2 hdc sts, *sc in ch-1 sp, sc in puff st, sc in ch-1 sp, sc in hdc; repeat from * across, sc in final st of row, ch 1, turn. (163)
Row 17 (WS): FPsc in each st across, ch 1, turn. (163)
Row 18 (RS): sc in first st, dc in next st, *sc in next st, dc in next st; repeat from * across, sc in final st, ch 1, turn. (163)
Row 19 (WS): dc in first st, sc in next st, *dc in next st, sc in next st; repeat from * across, dc in final st, turn. (163)
Repeat rows 18 and 19 7 more times.
Row 34 (RS): sc in each st across ch 1, turn. (163)
Repeat rows 2-34
Middle section:
Row 68 (WS): FPsc in each st across, ch 2 (counts as first hdc of next row), turn. (163)
Row 69 (RS): hdc in next st, *ch 1, sk st, hdc puff st in next st, ch 1, sk st, hdc in next st; repeat from * across, put hdc in final st of row. (40 hdc puff st, 43 hdc)
*Fasten off*
Working on right side,
Attach yarn to top of ch-2 from prev row,
Row 70 (RS): ch 1, sc in next 2 hdc sts, *sc in ch-1 sp, sc in puff st, sc in ch-1 sp, sc in hdc; repeat from * across, sc in final st of row, ch 1, turn. (163)
Row 71 (WS): FPsc in each st across, ch 1, turn. (163)
Row 72 (RS): sc in first st, dc in next st, *sc in next st, dc in next st; repeat from * across, sc in final st, ch 1, turn. (163)
Row 73 (WS): dc in first st, sc in next st, *dc in next st, sc in next st; repeat from * across, dc in final st, turn. (163)
Repeat rows 72 and 73 7 more times.
Fasten off, and weave in ends.
Make second end panel following rows 1-71.
Fasten off, and weave in ends.
Sewing the panels together:
Make sure both panels are positioned the same way, either front side up or back side up. Row 1 on both panels should be at the very outside ends. Sew panels together with whip stitch, then begin trim (see bottom of page).
Crochet a Large Throw Blanket:
Ends:
Ch 200,
Row 1 (RS): sc in second ch from hook, sc in each remaining st of row, ch 3 (counts as first dc of row 2), turn. (199)
Row 2 (WS): sk 2 sts, shell in next st, *sk 3 sts, shell in next st; repeat from * across, when there are 3 sts left in row, sk 2 sts, dc in final st, ch 3 (counts as first dc of row 3), turn. (49 shells, 2 dc)
Row 3 (RS): sk 2 sts, shell between 2nd and 3rd dc of shell from prev row, *sk 4 sts, shell between 2nd and 3rd dc of shell from prev row; repeat from * across, when there are 3 sts left in row, sk 2 sts, dc in top of ch 3, ch 2 (counts as first hdc of row 4), turn. (49 shells, 2 dc)
Row 4 (WS): hdc in next st, *ch 1, sk st, hdc puff st between 2nd and 3rd dc of shell from prev row, ch 1, sk st, hdc in next 2 sts; repeat from * across (note: final hdc will be worked in top of ch-3 from prev row), ch 1, turn. (49 hdc puff sts, 100 hdc)
Row 5 (RS): *sc in next 2 hdc sts, sc in ch-1 sp, sk puff st, sc in ch-1 sp; repeat from * across putting 2 sc in final st of row, ch 1, turn. (199)
Row 6 (WS): sc in each st across, ch 1, turn. (199)
You will now be working on 2 different rows. Your sc sts will be worked on row 7 as normal sts, and your FPtr2tog sts will be worked around the hdc sts you made in row 4. They should form peaks over top of the hdc puff sts. Remember to skip a stitch when you start making the sc sts again-the FPtr2tog counts as a st so you need to make room for it!
Row 7 (RS): sc in next 3 sts, *FPtr2tog placing first leg around hdc next to first puff st from row 4, place second leg around next hdc on other side of puff st from row 4, sc in next 3 sts; repeat from * across, ch 3 (counts as first dc of row 8), turn. (49 FPtr2tog, 150 sc)
Row 8 (WS): [Cross st across next 2 sts] 98 times, sk st, dc in final st of row, ch 3 (counts as first dc of row 9), turn. (198)
Row 9 (RS): [Cross st across next 2 sts] 98 times, dc in top of ch 3, ch 3 (counts as first dc of next row), turn. (198)
Repeat row 9 3 more times, on final repeat ch 1 to turn.
Row 13 (RS): sc in each st across, 2 sc in final st or row, ch 1, turn. (199)
Row 14 (WS): FPsc in each st across, ch 2 (counts as first hdc of next row), turn. (199)
Row 15 (RS): hdc in next st, *ch 1, sk st, hdc puff st in next st, ch 1, sk st, hdc in next st; repeat from * across, put hdc in final st of row. (49 hdc puff st, 52 hdc)
*Fasten off*
Working on right side,
Attach yarn to top of ch-2 from prev row,
Row 16 (RS): ch 1, sc in next 2 hdc sts, *sc in ch-1 sp, sc in puff st, sc in ch-1 sp, sc in hdc; repeat from * across, sc in final st of row, ch 1, turn. (199)
Row 17 (WS): FPsc in each st across, ch 1, turn. (199)
Row 18 (RS): sc in first st, dc in next st, *sc in next st, dc in next st; repeat from * across, sc in final st, ch 1, turn. (199)
Row 19 (WS): dc in first st, sc in next st, *dc in next st, sc in next st; repeat from * across, dc in final st, turn. (199)
Repeat rows 18 and 19 7 more times.
Row 34 (RS): sc in each st across ch 1, turn. (199)
Repeat rows 2-34
Middle section (repeat 3X total):
Row 68 (WS): FPsc in each st across, ch 2 (counts as first hdc of next row), turn. (199)
Row 69 (RS): hdc in next st, *ch 1, sk st, hdc puff st in next st, ch 1, sk st, hdc in next st; repeat from * across, put hdc in final st of row. (49 hdc puff st, 52 hdc)
*Fasten off*
Working on right side,
Attach yarn to top of ch-2 from prev row,
Row 70 (RS): ch 1, sc in next 2 hdc sts, *sc in ch-1 sp, sc in puff st, sc in ch-1 sp, sc in hdc; repeat from * across, sc in final st of row, ch 1, turn. (199)
Row 71 (WS): FPsc in each st across, ch 1, turn. (199)
Row 72 (RS): sc in first st, dc in next st, *sc in next st, dc in next st; repeat from * across, sc in final st, ch 1, turn. (199)
Row 73 (WS): dc in first st, sc in next st, *dc in next st, sc in next st; repeat from * across, dc in final st, turn. (199)
Repeat rows 72 and 73 7 more times.
Fasten off, and weave in ends.
Make second end panel following rows 1-71.
Fasten off, and weave in ends.
Sewing the panels together:
Make sure both panels are positioned the same way, either front side up or back side up. Row 1 on both panels should be at the very outside ends. Sew panels together with whip stitch, then begin trim (see bottom of page).
Blanket Trim (All sizes):
With right side facing, attach yarn to corner of blanket,
Round 1: ch 1, sc evenly around entire blanket, working (sc, ch 1, sc) in each corner, join with sl st to first sc.
Round 2: ch 1, hdc in each st around working (hdc, ch 1, hdc) in each corner, join with sl st to first hdc.
Round 3: ch 1, working in 3rd loop of hdc, sc in each st around, work (sc, ch 1, sc) in each corner, join with sl st to first sc.
Round 4: ch 1, sc in each st around working (sc, ch 1, sc) in each corner, join with sl st to first sc.
Fasten off, and weave in ends.
Want more gorgeous crochet patterns, and a little encouragement for your day? Sign up for my newsletter here! That way you’ll never miss out on special events, or freebies I’m offering.
JOIN ME ON SOCIAL MEDIA
I would love to see a picture when you’re done, so please feel free to come by my Facebook group and show off your finished project! Be sure to tag @kirstenhollowaydesigns when you share pictures of your blanket on Instagram!
You can also follow me on Facebook, Pinterest, Instagram, and Ravelry for more crochet patterns.
PATTERN TERMS AND CONDITIONS:
You are welcome to share the link to this pattern, using one image of your choice, on your site, but please do not share the written patterns themselves, or use additional images. You do not have permission to use my images by themselves to create pinnable graphics for Pinterest, since this causes confusion for the person visiting the link, however the image may be included in a roundup pin if there are 4 or more other patterns.
This pattern was made to be used by individuals, and small business crocheters alike. Selling your finished pieces in boutiques, at farmer’s markets, craft shows, and other local events is encouraged! Please credit/link Kirsten Holloway Designs when selling finished products online. The only thing I require is that this pattern not be used commercially to produce hundreds of thousands of copies. Also, if you sell finished items online, please do not use my pictures for your listings. I’m positive that your work is of high enough quality for you to sell the finished piece. Have confidence in your abilities! <3 Thank you!
Sharing a link to this post with your friends is also always appreciated!


