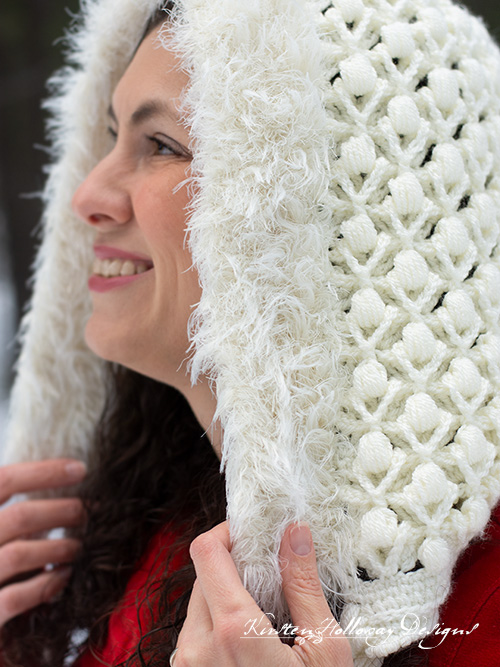
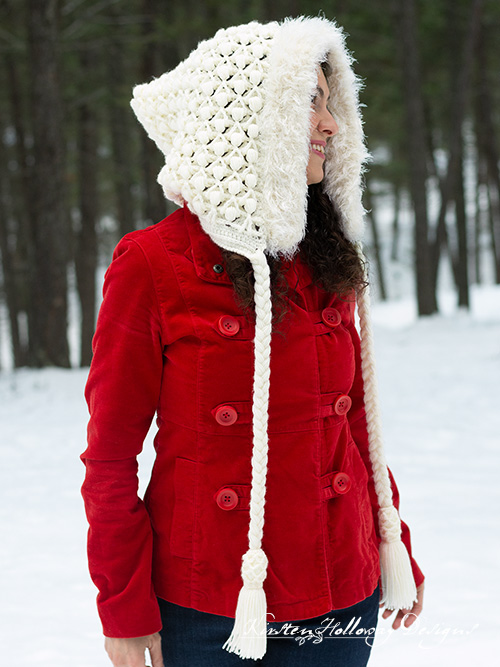
Crochet a cozy oversized hood with this breath-takingly beautiful winter crochet pattern! It’s piled high with rich texture that is warm and luxurious. The crochet pattern comes in 2 sizes for teens/adults and kids. Find the free crochet pattern instructions below, or purchase a print-optimized, ad-free PDF by clicking here.
Click here to add this to your Ravelry queue!
A couple years ago I designed the Snowberries winter scarf to be a rich, winter statement piece, and knew shortly after that that I needed to design a over-sized hood featuring the same stitch pattern! LoveCrafts was nice enough to send me some more of the same kind of yarn for me to play with.
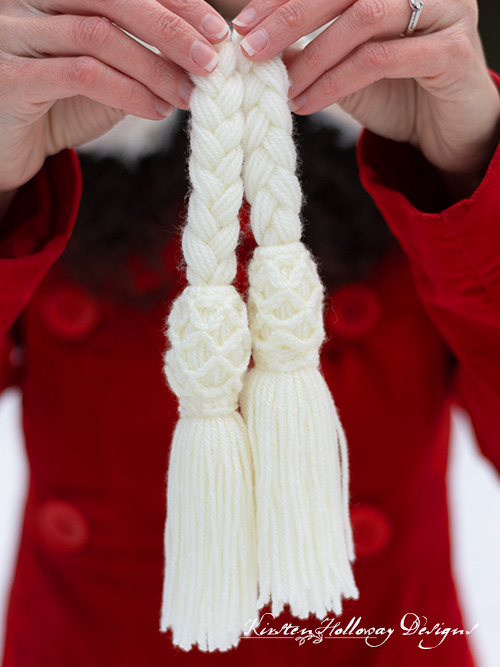
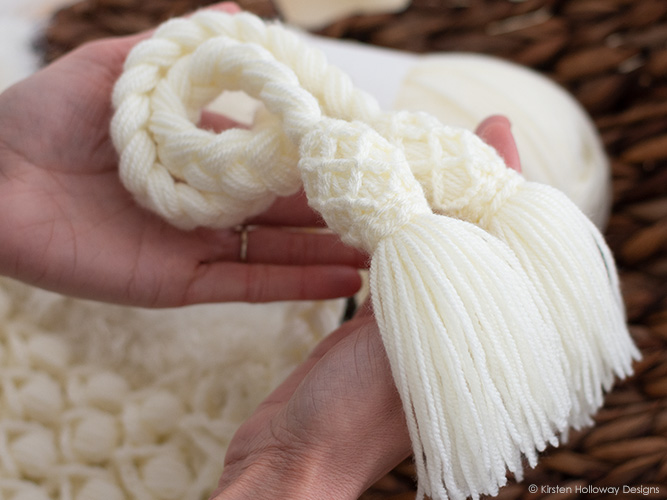
The construction of this hood is a very simple rectangle folded in half, but the details are really what make it shine! I used extra yarn to make the ties and tassels match the richness of the hood’s texture. In fact the tassels were so special they have ended up with their own tutorial page.
I chose to make my ties 24″ long because I will not be wearing this hat anywhere but the most special occasions. You can choose to make yours shorter if you need the hood to be more functional. But just look at how beautifully each section works together:
This was my first time using an “eyelash” style fur, and while I had my reservations initially, I am completely in love with the dreamy edge it gives to the hood! It is so much softer than it looks in the pictures and you really must feel it to appreciate it. A bonus is that it matches the yarn almost perfectly which is quite the find when using two different yarns from two different manufacturers. A huge thank you to the sweet ladies in my Facebook group for sharing lots of amazing tips for working with faux fur yarn when I had questions before I began that section. <3 They really are the best, and if you haven’t applied to join my group yet, I encourage you to do so!
Let’s get started crocheting!
Disclaimer: This post contains affiliate links. When you purchase something using these links a small amount of the sales price goes to me to help keep this site, and the patterns on it free. You do not pay any extra for the item you purchase.
Difficulty:
Intermediate
Materials Needed:
3.25mm (D) hook for hat body
6mm (J) hook for fur trim
520, 675 yds #3 light weight Paintbox Yarns Simply DK in Champagne White, or color of your choice. Use this link to get 15% off your purchase.
60, 70 yds King Cole Luxury Fur in “Polar”
Scissors
Measuring tape
Stitches Used:
ch = chain
sc = single crochet
FPsc = front post single crochet
dc = double crochet
tr = treble crochet
rsc = reverse single crochet/crab stitch
sc2tog = single crochet 2 together
Special Stitches:
Puff: yo, pull up a loop 6 times in same st, yo, pull through 12 loops, yo, pull through final 2 loops
Fan: (3 tr, ch 2, 3 tr) in same stitch
Working in the 3rd loop of hdc: Look at the top of the stitch, and locate the sideways “V”, bend the stitch to look at the back, and you should see another “V”. You’ll be working into the back loop of that “V”, this is called the 3rd loop.
Additional Terms:
Working in the 3rd loop of hdc: Look at the top of the stitch, and locate the sideways “V”, bend the stitch to look at the back, and you should see another “V”. You’ll be working into the back loop of that “V”, this is called the 3rd loop.
st/sts = stitch/stitches
sp/sps = space/spaces
prev = previous
Gauge:
Child: rectangle should measure 10″ wide before hood is assembled and fur trim is added
Teen/Adult: rectangle should measure 11″ wide before hood is assembled and fur trim is added
Measurements:
Child: 11” tall by 11” wide excluding ties
Teen/Adult: 13” tall by 13” wide excluding ties
Additional Notes:
-ch-1 at end of row does not count as a st.
-ch-3 counts as dc, ch-4 counts as tr.
-All turning chains are not included in stitch counts at end of row.
-Pattern is worked in multiples of 8 + 4.
-The King Cole Luxury Fur yarn is held double for a more luxurious look. If you substitute with a different type of fur yarn you may only need 1 strand.
–If this stitch is new to you here is a short tutorial video on how to work it:
Snowberries Oversized Winter Hood Pattern (US Terms):
Click here to purchase an ad-free, print-optimized PDF of this pattern on LoveCrafts
You will begin by crocheting the rectangle that will form the hood.
Ch 44, 52,
Row 1: dc in 4th ch from hook (skipped chains count as first dc), sk 3 sts, (3 tr, ch 2, 3 tr) in next st (fan created), sk 3 sts, *puff in next, sk 3 sts, fan in next st, sk 3 sts; repeat from * across, when you get to end of row, work 2 dc in final ch, ch 1, turn. (5 [6] fans, 4 [5] puffs, 3 dc)
Row 2: sc in first dc, ch 1, sk st, *FPsc around next 3 tr sts, you will now create a “V” using chains behind your work: ch 5, bend work forward so you are looking at the back of the piece, sc in ch at bottom of fan (there should be a gap where those 6 tr sts (Fan) were worked in the prev row), ch 5, FPsc around next 3 tr sts, ch 2, sk puff st; repeat from * across, end row by only chaining 1, sk dc st, sc in top of ch-3 from prev row, ch 5 (counts as first tr, + ch sp), turn. (30 [36] FPsc, 4 [5] ch-2 sps, 5 [6] V’s, 7 [8] sc, 2 ch-1 sps)
Row 3: 3 tr in first sc, puff in ch-2 sp at center of fan from row 1, *fan in ch-2 sp from prev row, puff in ch-2 sp at center of fan from row 1; repeat from * across, end with (3 tr, ch 1, tr) in final sc of row, ch 1, turn. (7 tr, 4 [5] fans, 5 [6] puff stitches, 1 ch-1 sp)
Row 4: sc in first tr, ch 1, *FPsc around each of next 3 tr sts, ch 2, sk puff st, FPsc around next 3 tr sts, ch 5, bend work forward so you are looking at the back of the piece, FPsc around top of puff from row 3 near bottom of fan, ch 5; repeat from * across, end row with FPsc around top of next 3 tr sts, ch 2, FPsc around next 3 tr, ch 1, sc in top of 5th ch from prev row, ch 3 (counts as first dc of next row), turn. (2 sc, 2 ch-1 sps, 5 [6] ch-2 sps, 34 [42] FPsc, 4 [5] V’s)
Row 5: dc in first sc, fan in ch-2 sp from prev row, puff in ch-2 sp at center of fan from row 4, *fan in ch-2 sp from prev row, puff in ch-2 sp at center of fan from row 4; repeat from * across, omitting puff on final repeat, work 2 dc in final sc, ch 1, turn. (5 [6] fans, 4 [5] puffs, 5 [6] ch-2 sps, 3 dc)
Row 6: sc in top of first dc, ch 1, sk st *FPsc around next 3 tr sts, ch 5, bend work forward so you are looking at the back of the piece, FPsc around top of puff from row 3, ch 5, FPsc around top of next 3 tr sts, ch 2; repeat from * across, end row by only chaining 1, sk dc st, sc in top of ch-3 from prev row, ch 5 (counts as first tr, + ch sp). (35 [42] FPsc, 5 [6] ch-2 sps, 5 [6] V’s, 7 [8] sc, 2 ch-1 sps)
Repeat rows 3-6 until your piece measures 20 [24]” long.
Fold rectangle in half with right sides together and sc or sew one of the long sides together creating a hood.
Fasten off, weave in ends.

Turn hood right-side out.
You will now begin the edging. Exact stitch counts are not necessary, but I encourage you to keep them close to what I have listed. The goal of this bottom edging is to suck the back of the bonnet in a bit. You can either work regular sc, or you can work center sc. I worked mine as center sc because I think it looks tidier than the regular sc. The choice is totally up to you, however. 🙂
Bottom Edging:
Attach yarn to bottom left side of hood,
Row 1: Working along bottom edge, ch 1, sc evenly along edge working a sc in each ch and sc st across, note: the first part of the row should be your base chain that you started the hood with, and the second part of the row is the final row. For that section work a sc in each BPsc, a sc in each ch-2 sp, ch 1, turn. (approximately 84 [100] sc)
Row 2: *sc in next 30 sts, sc2tog across next 24 [40] sts, sc in next 30 sts, ch 1, turn. (Approximately 72 [80] sc)
Row 3: hdc in each st across, ch 1, turn (same stitch count as prev row)
Row 4: working in 3rd loop of hdc, sc in each st across, ch 1, turn. (same stitch count as prev row)
Row 5: sc in each st across, ch 1. (same stitch count as prev row)
Row 6: working back the way you came, rsc in each st across. (same stitch count as prev row)
Fasten off, weave in ends.
You should start to see the hood taking shape. We will now prepare to crochet the fur trim across the front.
You may notice that this front edge is a little floppy. We will correct it in the next row by reducing the stitch count. I worked sc2tog stitches all across the front. You may only need to work them every couple of stitches. Crocheting the fur trim will add width back in.
When working across the edge remember this rule of thumb: sc and hdc sts get 1 st worked in the side, dc sts get 2, and tr get 3. As you work your sc2tog sts remember this and reduce accordingly. *This is not an exact science. You simply want your edge to be straight and not flop.*
Attach yarn to hood just above the bottom trim section,
Row 1: *sc2tog across next 2 sts, Note: remember, this is referring to how many sts will get worked into the side of your sc, hdc, dc, or tr according to the rule of thumb I just shared. You may need to work your sc2tog sts less frequently to get your edge to lay flat. In that case simply work regular sc sts between them. If the top of your hood sucks in just a tiny bit this is ok.; repeat from * across.
Fasten off, and weave in ends.
Crocheting the Fur Trim:
Turn hood inside out. Fur looks best when worked with the back side facing the front of your piece.
Attach yarn to bottom right side of hood,
Using 6mm (J) hook, with 2 strands of King Cole Luxury Fur yarn,
Note: For child size, work row 2 then skip to row 4.
Row 1: hdc in each st across, ch 1, turn
Rows 2-3: hdc in each st across, ch 1, turn
Row 4: working back the way you came, rsc in each st across.
Fasten off, and weave in ends.

Ties:
Cut 21 pieces of yarn 48” in length for each tie. Divide into 3 equal sections with 7 strands each.
You will now attach your ties to the bottom edging/trim of your hood. You will pull each of your 3 sections through a different row of the bottom edging so that it’s spread across the whole end of the raw edge. Here’s a picture that shows the first 2 ties pulled through:

After each section is pulled through, make sure the ends are even. Braid all 3 sections into a tie.
Tassels:
These tassels are so gorgeous that I thought they deserved a post and tutorial of their own. Head over to the tassel tutorial page for full instructions, and pictures!
Want more gorgeous crochet patterns, and a little encouragement for your day? Sign up for my newsletter here! That way you’ll never miss out on special events, or freebies I’m offering.
JOIN ME ON SOCIAL MEDIA
I would love to see a picture when you’re done, so please feel free to come by my Facebook group and show off your finished project! Be sure to tag @kirstenhollowaydesigns when you share pictures of your project on Instagram!
You can also follow me on Facebook, Pinterest, Instagram, and Ravelry for more beautiful crochet patterns.
PATTERN TERMS AND CONDITIONS:
You are welcome to share the link to this pattern, using one image of your choice, on your site, but please do not share the written patterns themselves, this includes my Ravelry downloads or translations of these patterns, or use additional images. You do not have permission to use my images by themselves to create pinnable graphics for Pinterest, however they may be included in a roundup pin if there are 4 or more other patterns. If you sell finished items online, please do not use my pictures for your listings. I’m positive that your work is of high enough quality for you to sell the finished piece. Have confidence in your abilities! <3 Thank you!
This pattern was made to be used by individuals and small business crocheters alike. Selling your finished pieces in boutiques, at farmer’s markets, craft shows, and other local events is encouraged! Please credit/link Kirsten Holloway Designs when selling finished products online. The only thing I require is that this pattern not be used commercially to produce hundreds of thousands of copies. If you enjoyed this pattern or found it useful, why not share a link to this post with your friends?


