Lacy boot cuffs make pretty accents to the bride and her bridesmaids, or if you want to wear something light weight an pretty with your boots (I can’t be the only one that periodically wears boots in the summer, right?). Scroll down to get to the free crochet pattern. Find the free crochet pattern instructions below, or purchase a print-optimized, ad-free PDF by clicking here.
Click here to add this to your Ravelry queue!

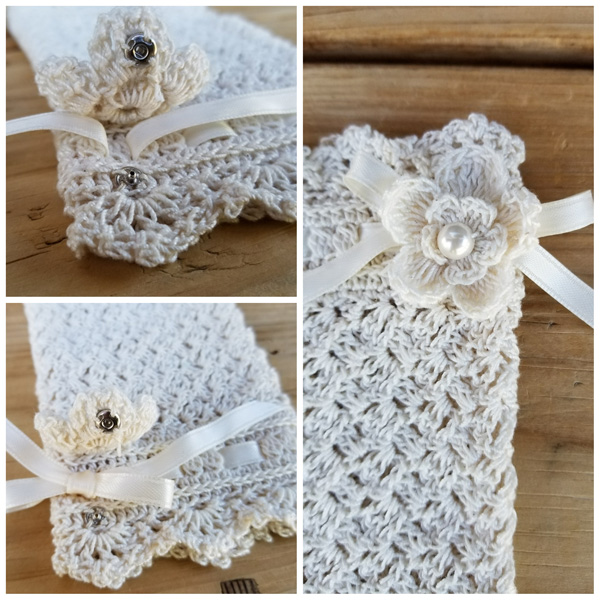
These delicate crochet lace boot cuffs are light weight and work great for special warm-weather events. They match beautifully with the garter, and the lace fingerless gloves that I designed a few years ago.
But they don’t have to be for weddings only, check out how this boot cuff pattern looks when crocheted with a darker color:

So relaxed and cottage-like! You could leave the ribbon off and they’d still be cute. I’d love to know which style you love the best!
I used Aunt Lydia’s #10 thread for this project because it comes in some very pretty colors. It’s also fairly sturdy and I’m confident that the things I crochet with it will last a long time.
Make it a set with the other patterns in this series:
Disclaimer: This post contains affiliate links. When you purchase something using these links a small percentage of the sales price goes to me. However, you do not pay any extra for the item you purchase.
Difficulty:
Intermediate
Techniques used: picots, 3dc clusters, fans, half-double crochet in the 3rd loop.
Materials Needed:
- 1.5mm steel hook, or hook needed to obtain gauge
- Approximately 200 (240, 280, 320, 360, 400) yds, Aunt Lydia’s #10 crochet thread in “Natural”, or “Taupe Clair”
- Scissors
- Yarn needle
- 2 yards of ¼” satin ribbon in off-white or color of your choice
- 2 pearl beads
- 2 3/0 metal snaps
- Heavy-duty button thread
- Sewing needle
- 2 flowers made from my Delicate Flower Clip pattern
Stitches Used:
- sl st = slip stitch
- ch/chs = chain/chains
- sc = single crochet
- hdc = half double crochet
- dc = double crochet
Additional Terms:
- 3dc cluster: YO, insert hook into stitch, pull up a loop, YO, draw through 2 loops (1st stitch of cluster made), YO, insert hook into same st, pull up a loop, YO draw through 2 loops (2nd st of cluster made), YO, insert hook into same st, pull up a loop, YO, draw through 2 loops (3rd st of cluster made), YO, draw through all loops on hook.
- Working in the 3rd Loop of hdc – Instructions: Look at the top of the stitch, and locate the sideways “V”, bend the stitch to look at the back and you should see another “V” made by the “yarn over”. You’ll be working into the back loop of that “V”. This is called the 3rd loop.
- Picot = ch 2, sl st back into stitch just worked.
- st/sts = stitch/stitches
- sp/sps = space/spaces
Gauge:
- 28 hdc in 4”, 4 shell rounds in 1” of height
Measurements:
7.5″ tall by:
- 5” wide (x-small)
- 6” wide (small)
- 7” wide (medium)
- 8” wide (large)
- 9” wide (x-large)
- 10″ wide (2XL)
Additional Notes:
- ch-1 at beginning of round does not count as stitch.
- The tulip stitch is worked in multiples of 4, but for the purposes of this design, you will need to work in multiples of 8 if you wish to make adjustments beyond the 6 I have listed here.
Wrapped in Lace Boot Cuffs (US Terms):
Ch 72, [88, 104, 120, 136, 152] join with sl st to first ch.
Round 1: ch 1, hdc in each ch around, join with sl st to first hdc. (72, [88, 104, 120, 136, 152])
Round 2: ch 1, working in 3rd loop of hdc, hdc in each st around, join with sl st to first hdc. (72, [88, 104, 120, 136, 152])
Round 3: ch 1, working in 3rd loop of hdc, sc in each st around, join with sl st to first sc. (72, [88, 104, 120, 136, 152])
Round 4: ch 1, (2 dc, ch 2, sc) in first st, sk 3 sts, *(2 dc, ch 2, sc) in next st, sk 3 sts; repeat from * around, join with sl st to first dc, ch 1, turn. (20, [22, 24, 26, 28, 30] shells)
The following rounds will be worked like rows in that after joining the round, you will turn and work back the way you came.
Round 5: (2 dc, ch 2, sc) in first ch-2 sp, sk 3 sts, *(2 dc, ch 2, sc) in next ch-2 sp, sk 3 sts; repeat from * around, join with sl st to first dc, ch 1, turn. (20, [22, 24, 26, 28, 30] shells)
Repeat round 5 18 times or until your piece measures approximately 5” tall. You can make these boot cuffs taller if you wish by repeating round 5 several more times. Just make sure you are going in the original direction when you begin the top trim or your stitch detail will be on the inside of the piece.
Round 24: ch 1, hdc in first st, *hdc in ch-2 sp, hdc in next 3 sts; repeat from * around, omitting 3rd st on final repeat, join with sl st to first hdc. (72, [88, 104, 120, 136, 152])
Round 25: ch 1, working in 3rd loop of hdc, hdc, in each st around, join with sl st to first hdc. (72, [88, 104, 120, 136, 152])
Round 26: ch 1, working in 3rd loop of hdc, sc, in each st around, join with sl st to first sc. (72, [88, 104, 120, 136, 152])
Round 27: ch 1, (3dc cluster, ch 1) in first st, sk st, *(3dc cluster, ch 1) in next st, sk st; repeat from * around, join with sl st to first 3dc cluster. (36, [44, 52, 60, 68, 76] 3dc clusters, 36, [44, 52, 60, 68, 76] ch-1 sps)
Round 28: ch 1, sk st, *2 hdc in ch-1 sp, sk st; repeat from * around, join with sl st to first hdc. (72, [88, 104, 120, 136, 152])
Round 29: ch 1, working in 3rd loop of hdc, hdc in each st around, join with sl st to first hdc. (72, [88, 104, 120, 136, 152])
Round 30: ch 1, working in 3rd loop of hdc, sc in each st around, join with sl st to first sc. (72, [88, 104, 120, 136, 152])
Round 31: ch 3, sk st, sl st in next st, *ch 4, sk 3 sts, sl st in next st, ch 3, sk st, sl st in next st; repeat from * around, final sl st counts as join. (9 [11, 13, 15, 17, 19] ch-4 sps, 18 [22, 26, 30, 34, 38] ch-3 sps)
You will now be working fans in the ch-4 sps from the prev round.
Round 32: sl st into first ch, *working in next ch-4 sp ([dc, ch 1] 6 times, dc), (sl st, ch 3) in next ch-3 sp, sl st in next ch-3 sp; repeat from * around, final sl st counts as join. (9 [11, 13, 15, 17, 19] 7-dc fans, (9 [11, 13, 15, 17, 19] ch-3 sps)
In the following round you will be creating lacy chain accents across the top of each fan, and creating a picot in the ch-3 sp between the fans. I’ve included a few pictures of the steps to help you with this part. It goes from left to right, top to bottom.
Round 33: working across fan in ch-1 sps: *[ch 3, sk st, sl st into next ch-1 sp] 3 times, note: this is where the picture tutorial starts: (ch 4, sl st into same ch-1 sp, ch 3), sk st, sl st into next ch-1 sp, ch 3, sk st, sl st in next ch-1 sp, ch 3, sk st, sl st into sl st from prev round, (2 sc, picot, sc) in ch-3 sp between fans, sl st into sl st from prev round; rep from * around, join with sl st to first sl st. (9 [11, 13, 15, 17, 19] shells, 9 [11, 13, 15, 17, 19] picots)

Bottom Edging for Boot Cuffs:
This edging works with any of the boot cuff sizes:
Round 1: *ch 2, sk st, sl st in next st; repeat from * around, final sl st counts as join. (44, [52, 68, 76] ch-2 sps)
Round 2: sl st into ch-2 sp, ([dc, picot, ch 1] 2 times, dc, picot) in next ch-2 sp, sl st in next ch-2 sp, ch 2, sl st into next ch-2 sp; repeat from * around, final sl st counts as join. (11 [13, 17, 19] shells)
Fasten off, and weave in ends.
Bottom edging (Alternative):
If your boot cuff chain count is in a multiple of 12 (ie. 72, 120) there is a slight modification on the original boot cuff trim if you’d like some variety. The difference is hardly noticeable, but it’s there! Follow these instructions to make that:
Round 1: *ch 2, sk st, sl st in next st; repeat from * around, final sl st counts as join. (36 [60] ch-2 sps)
Round 2: sl st into ch-2 sp, *([dc, picot, ch 1] 2 times, dc, picot) in next ch-2 sp, sl st in next ch-2 sp; repeat from * around, final sl st counts as join. (12 [20]shells, 12 [20] ch-2 sps)
Fasten off, and weave in ends.
Cut 1 yd length of 1/4” satin ribbon per boot cuff, run it through round 27 (or which ever round has the 3dc cluster stitches). I ran it over and under every 2 clusters.
Crochet 2 tiny thread flowers:
You will now want to crochet the little flowers that go near the top of the boot cuff. Find those instructions over here. Once you have 2 of them made you can come back here for the finishing instructions.
Sewing the flower that keeps the bow in place to the top band.
My flower was positioned across from the seam up the inside of the boot cuff. 2 petals were pointing down toward the bottom of the cuff, and 1 petal was pointing up toward the top of the cuff.

Sew the 2 petals pointing down to the hdc in the 3rd loop round.
Tie a bow with ribbon under the flower. Sew one side of snap to petal at top. Sew other side of snap to cuff. Tie a bow under the flower and then fasten the snaps together st the top to cover the bow. If you have made the matching fingerless bridal gloves this is exactly the same idea. (I’ve included that image below as a reference)
Trim ends of bow to desired length. Coat ends with fray check to prevent raveling.
And that’s it! You now have a beautiful pair of boot cuffs that will work during the Summer (and Spring and Fall). I hope you enjoy wearing them!

.sdg.
Want more gorgeous crochet patterns, and a little encouragement for your day? Sign up for my newsletter here! That way you’ll never miss out on special events, or freebies I’m offering.
JOIN ME ON SOCIAL MEDIA
I would love to see a picture when you’re done, so please feel free to come by my Facebook group and show off your finished project! Be sure to tag @kirstenhollowaydesigns when you share pictures of your project on Instagram!
You can also follow me on Facebook, Pinterest, Instagram, and Ravelry for more beautiful crochet patterns.
PATTERN TERMS AND CONDITIONS:
You are welcome to share the link to this pattern, using one image of your choice, on your site, but please do not share the written patterns themselves, this includes my Ravelry downloads or translations of these patterns, or use additional images. You do not have permission to use my images by themselves to create pinnable graphics for Pinterest, however they may be included in a roundup pin if there are 4 or more other patterns. If you sell finished items online, please do not use my pictures for your listings. I’m positive that your work is of high enough quality for you to sell the finished piece. Have confidence in your abilities! <3 Thank you!
This pattern was made to be used by individuals and small business crocheters alike. Selling your finished pieces in boutiques, at farmer’s markets, craft shows, and other local events is encouraged! Please credit/link Kirsten Holloway Designs when selling finished products online. The only thing I require is that this pattern not be used commercially to produce hundreds of thousands of copies. If you enjoyed this pattern or found it useful, why not share a link to this post with your friends?


