Crochet a floral afghan block for your next blanket with this free crochet square pattern. It has rich textures and a relaxing color scheme that makes it a favorite for almost any time of year. Use Ombre yarn for a gradual color fade effect, or 4 separate hues for a more defined look. Find the free crochet pattern instructions below, or purchase a print-optimized, ad-free PDF by clicking here.
Click here to add this to your Ravelry queue.
This crochet pattern is part of the 2023 Moogly Afghan CAL! To see all the other squares and to follow along with us head over here. The Verdant Spring 12-inch crochet block is #23 out of 24 unique squares released by different crochet designers during the past several months.

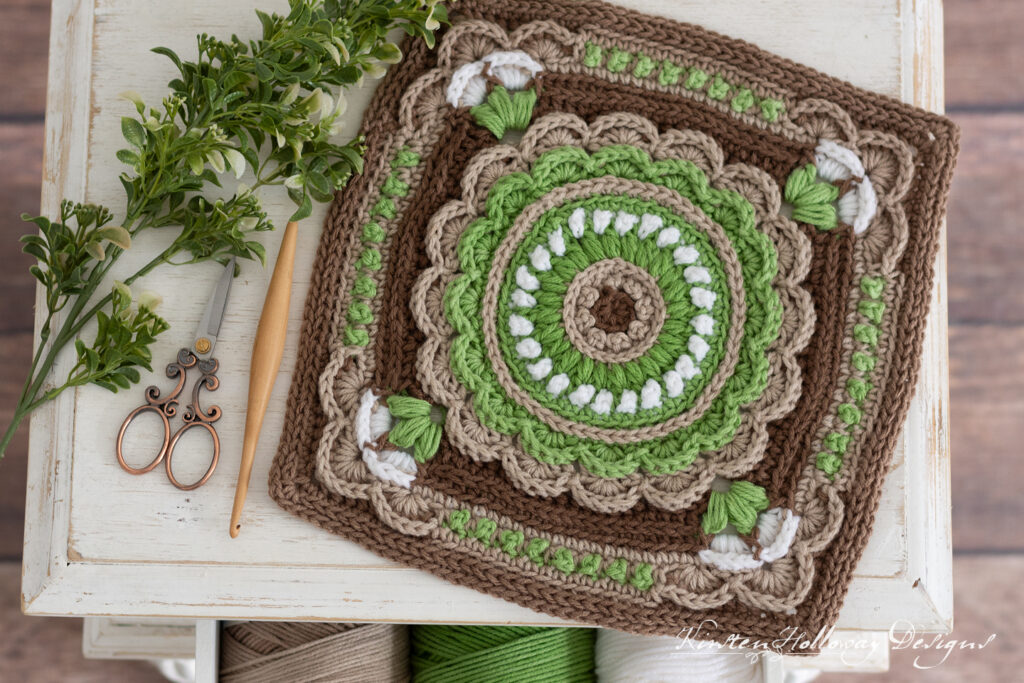
If you’ve been following my blog for any length of time you know how much I love flowers/floral elements and texture! This pretty square is based on a hat pattern I designed earlier in the year. It’s not as detailed due to it being crocheted with worsted weight yarn, but I’ve tried to capture some of the same beauty and delicate details.
For this project I used 2 different hues of Red Heart Ombre yarn: Cocoa and Apple Green, and a small amount of Red Heart With Love in White. The gradual color changes don’t show up so much with the green, but they are more visible with the brown since I used more of it.

I also crocheted a single color square with the Cocoa brown hue that would make a nice accent block if using this multiple squares from this pattern in a blanket. You’ll be able to see that square in the pattern tutorial at the bottom of this post.
Disclaimer: This post contains affiliate links. When you purchase something using these links a small percentage of the sales price goes to me. However, you do not pay any extra for the item you purchase.
Difficulty:
Intermediate
Techniques used: working in the 3rd loop of a half-double crochet, working in the back bar of a single crochet, Puff stitches, Shell stitches, Picot Single Crochet, back post stitches.
Materials Needed:
6mm J hook, or hook needed to obtain gauge
170-180 yds #4 worsted weight yarn in colors “Apple Green Ombré“, “Coco Ombré“, and Red Heart With Love in “White”, or 4 colors of your choice. Red Heart With Love in “Lettuce”, and “White”, and Red Heart Super Saver in “Café Latte”, and “Buff” will be close matches if you do not wish to use the ombré yarn.
Yarn needle
Scissors
Stitch markers
Yarn winder (Optional)
Stitches used:
ch = chain
sl st =slip stitch
sc = single crochet
hdc = half double crochet
dc = double crochet
BPsc = back post single crochet
BPhdc = back post half double crochet
Additional terms:
Picot single crochet (psc) = insert hook through top of st, yo, pull up a loop, [yo, draw through 1 loop] 3 times making a ch-3, yo, draw through final 2 loops on hook. Pull your ch-3 sp towards row front of your work instead of pushing it toward the back.
Small puff stitch = [yo, pull up a loop] 3 times in same st, yo, pull through 6 loops, yo pull through final 2 loops.
Puff stitch = [yo, pull up a loop] 4 times in same st, yo, pull through 8 loops, yo pull through final 2 loops.
Back bar of sc = look at the back of the stitch and locate the short bar that runs horizontal. Work all designated stitches for the round into this bar. This is a different location than the back loop!
BLO = back loop only
st/sts = stitch/stitches
sp/sps = space/spaces
sk = skip
prev = previous
Gauge:
5” across after round 6
Measurements:
12×12 inches after blocking
Additional Notes:
-Ch-1 at beginning of round does not count as a stitch.
-If making this square with a single color: please ch-1 to begin new round. If using multiple colors: color changes at the beginning of a new round will be done with a chainless starting method.
-If using Ombre yarn you will use the darkest shade as color A and the lightest as color B. You may wish to use a yarn winder to separate out the colors before you begin.
-If you are not familiar with the magic circle starting technique you can learn how over here.
Verdant Spring 12-inch Crochet Square (US Terms):
With color A,
Round 1: 8 hdc in magic circle, join with sl st to first hdc. (8)
Drop color A,
With Color B,
Round 2: ch 1, working in BLO, (sc, psc) in first st, *(sc, psc) in next st; repeat from * around, join with sl st to first sc. (16)
Round 3: ch 1, sc in first st, 2 sc in next st, *sc in first st, 2 sc in next st; repeat from * around, join with sl st to first sc. (24)
Drop color B,
With color C,
Round 4: ch 1, working in back bar of sc, (small puff, ch 1) in each st around, join with sl st to first puff. (24 puff sts, 24 ch-1 sps)
In the following round you will be changing colors every stitch. Pull the next color you use through the last 2 loops of the previous stitch.
Round 5: ch 1, *(with color D, psc, with color C, sc) in ch-1 sp; repeat from * around, join with sl st to first psc. (24 psc, 24 sc)
Drop color D,
With color C,
Round 6: ch 1, sc in each st around, join with sl st to first sc. (48)
Drop color C,
At this point your circle should measure 5” across.
With color B,
Round 7: ch 1, working in BLO, 2 sc in first st, sc in next 3 sts, *2 sc in next st, sc in next 3 sts; repeat from * around, join with sl st to first sc. (60)
Drop color B,
With color C,
Round 8: ch 1, working in back bar of sc, *2 sc in next st, sc in next 14 sts; repeat from * around, join with sl st to first sc. (64)
In rounds 9 and 11 sl sts are not counted as stitches. You will skip over them when working rounds 10 and 12.
Round 9: *sk st, 5 dc in next st, sk st, sl st in next st; repeat from * around, final sl st counts as join. (16 5dc shells)
Drop color C.
With color B,
Round 10: ch 1, *working across shell: BPhdc around first st, BPsc around next 3 sts, BPhdc around next st, move to next shell; repeat from * around, join with sl st to first BPhdc. (80)
Circle should measure 7 1/2” across
Round 11: *sk 2 sts, 6 dc in next st, sk 2 sts, sl st between posts of the 2 BPhdc sts from prev round; repeat from * around, final sl st counts as join. (16 petals consisting of 6 sts each)
Drop color C,
In the following round you will be creating textured petals through the use of back post stitches, as well as 4 ch-sps for the corners as we turn the circle into a square.
With color A,
Round 12: ch 1 *[working across shell: BPhdc around next st, BPsc around next 4 sts, BPhdc around next st] 4 times, ch 2; repeat from * around, join with sl st to first BPhdc. (96 BP sts, 4 ch-2 sps)
In the following round I carried my green yarn (color C) behind my work and then worked over the ends in round 14.
Round 13: sl st into next st, ch 1, *hdc in next 4 sts, sc in next 5 sts, 2 sc in next st, sc in next 6 sts, hdc in next 4 sts, sk 2 sts, with color C, ([puff, ch 2] 2 times, puff) in ch-2 sp, sk 2 sts; repeat from * around, join with sl st to first hdc. (52 sc, 32 hdc, 12 puff sts, 8 ch-2 sps)
In the following round I carried my white yarn (color D) behind my work and then worked over the ends in round 15. Please note the 3rd loop of the hdc immediately after working the last FPsc around the puff stitch in the corner will be a little bit hard to see. You may wish to mark it.
Round 14: ch 1, *working in 3rd loop of hdc, hdc in next 4 sts, working in back bar of sc, sc in next 13 sts, working in 3rd loop of hdc, hdc in next 4 sts, FPsc around top of puff, with color D, (hdc, 3 dc, hdc) in ch-2 sp, with color A, FPsc around top of puff, with color D, (hdc, 3 dc, hdc) in ch-2 sp, with color A, FPsc around top of puff; repeat from * around, join with sl st to first hdc. (52 sc, 32 hdc, 12 FPsc, 8 shells)
Drop colors A and C,
With color B,
Round 15: working in BLO, sc in next 22 sts, BPsc around next 5 sts, ch 1, sk st (this is the FPsc in the middle of your 3-puff shell), BPsc around next 5 sts, *working in BLO, sc in next 23 sts, BPsc around next 5 sts, ch 1, sk st (this is the FPsc in the middle of your 3-puff shell), BPsc around next 5 sts; repeat from * around, working in BLO, sc in final st of round, join with sl st to first sc. (92 sc, 40 BPsc)
In the following round I strung the green color loosely around the corners and then worked over the yarn in round 17.
Round 16: sl st into next st, ch 1, *sc in next st, [with color C, psc in next st, with color B, sc in next st] 8 times, sk 2 sts, 6dc in next st, sk 2 sts, sl st in next st, sk 2 sts, 8 dc in ch-1 sp, sk 2 sts, sl st in next st, sk 2 sts, 6 dc in next st, sk 2 sts; repeat from * around, join with sl st to first sc. (32 psc, 36 sc, 8 6-dc shells, 4 8-dc shells)
Drop color C and fasten off.
With Color B,
Round 17: ch 1, *sc in next 17 sts, with color A, BPhdc around next st, BPsc across next 4 sts, BPhdc around next 4 sts, BPsc around next st, ch 2, BPsc around next st, BPhdc around next 4 sts, BPsc across next 4 sts, BPhdc around next st, with color B; rep from * around, join with sl st to first sc. (37 sts per side)
Drop Color B and fasten off.
With Color A,
Round 18: ch 1, *working in BLO, sc in next 17 sts, sc in next 10 sts, (hdc, ch 1, hdc) in ch-2 sp, sc in next 10 sts; repeat from * around, join with sl st to first sc. (39 sts per side)
If you need your square a little larger:
Round 19: ch 1, working in back bar of sc, sc in each st around (sc, ch 1, sc in ch-1 sps at corners), join with sl st to first sc. (41 sts per side)
Fasten off, and weave in ends.
Block if desired.
Verdant Spring Picture Guide
If you are more of a visual person I’ve put together a simple round-by-round picture guide to help you complete this project. This tutorial is done with 1 single color, but I have included the color change information for your reference. You can also join the Moogly Afghan CAL group for additional help.
If you are on a mobile device you can pinch to zoom in and out on the images themselves.
With color A,
Round 1: 8 hdc in magic circle, join with sl st to first hdc. (8)
Drop color A,

With Color B,
Round 2: ch 1, working in BLO, (sc, psc) in first st, *(sc, psc) in next st; repeat from * around, join with sl st to first sc. (16)
The first 2 images show how to make the psc (picot single crochet) stitch. The 3rd image shows the completed round.


Round 3: ch 1, sc in first st, 2 sc in next st, *sc in first st, 2 sc in next st; repeat from * around, join with sl st to first sc. (24)
Drop color B,

With color C,
Round 4: ch 1, working in back bar of sc, (small puff, ch 1) in each st around, join with sl st to first puff. (24 puff sts, 24 ch-1 sps)
in the following images you can see the location of the back bar at the back of the piece. Do not turn your piece over to crochet this round. The first 2 images are just for your own reference. The 3rd image shows what a small puff worked into that back bar should look like.


Here’s what round 4 should look like when you finish it:

In the following round you will be changing colors every stitch. Pull the next color you use through the last 2 loops of the previous stitch.
Round 5: ch 1, *(with color D, psc, with color C, sc) in ch-1 sp; repeat from * around, join with sl st to first psc. (24 psc, 24 sc)
Drop color D,

With color C,
Round 6: ch 1, sc in each st around, join with sl st to first sc. (48)
Drop color C,
At this point your circle should measure 5” across.

With color B,
Round 7: ch 1, working in BLO, 2 sc in first st, sc in next 3 sts, *2 sc in next st, sc in next 3 sts; repeat from * around, join with sl st to first sc. (60)
Drop color B,

With color C,
Round 8: ch 1, working in back bar of sc, *2 sc in next st, sc in next 14 sts; repeat from * around, join with sl st to first sc. (64)

In rounds 9 and 11 sl sts are not counted as stitches. You will skip over them when working rounds 10 and 12.
Round 9: *sk st, 5 dc in next st, sk st, sl st in next st; repeat from * around, final sl st counts as join. (16 5dc shells)
Drop color C.

With color B,
Round 10: ch 1, *working across shell: BPhdc around first st, BPsc around next 3 sts, BPhdc around next st, move to next shell; repeat from * around, join with sl st to first BPhdc. (80)
Circle should measure 7 1/2” across

Round 11: *sk 2 sts, 6 dc in next st, sk 2 sts, sl st between posts of the 2 BPhdc sts from prev round; repeat from * around, final sl st counts as join. (16 petals consisting of 6 sts each)
Drop color C,
The following pictures show the spots (pointed out with needles) where you need to work your slip stitches:


Here is what the round should look like when you are done:

In the following round you will be creating textured petals through the use of back post stitches, as well as 4 ch-sps for the corners as we turn the circle into a square.
With color A,
Round 12: ch 1 *[working across shell: BPhdc around next st, BPsc around next 4 sts, BPhdc around next st] 4 times, ch 2; repeat from * around, join with sl st to first BPhdc. (96 BP sts, 4 ch-2 sps)
I marked the ch-2 sps so you can see where your corners are going to be:

In the following round I carried my green yarn (color C) behind my work and then worked over the ends in round 14.
Round 13: sl st into next st, ch 1, *hdc in next 4 sts, sc in next 5 sts, 2 sc in next st, sc in next 6 sts, hdc in next 4 sts, sk 2 sts, with color C, ([puff, ch 2] 2 times, puff) in ch-2 sp, sk 2 sts; repeat from * around, join with sl st to first hdc. (52 sc, 32 hdc, 12 puff sts, 8 ch-2 sps)
Here’s the repeat section up close:

And here is the finished round:

In the following round I carried my white yarn (color D) behind my work and then worked over the ends in round 15. Please note the 3rd loop of the hdc immediately after working the last FPsc around the puff stitch in the corner will be a little bit hard to see. You may wish to mark it.
Round 14: ch 1, *working in 3rd loop of hdc, hdc in next 4 sts, working in back bar of sc, sc in next 13 sts, working in 3rd loop of hdc, hdc in next 4 sts, FPsc around top of puff, with color D, (hdc, 3 dc, hdc) in ch-2 sp, with color A, FPsc around top of puff, with color D, (hdc, 3 dc, hdc) in ch-2 sp, with color A, FPsc around top of puff; repeat from * around, join with sl st to first hdc. (52 sc, 32 hdc, 12 FPsc, 8 shells)
Drop colors A and C,
Again, here’s the repeat section up close:

And the finished round:

With color B,
Round 15: working in BLO, sc in next 22 sts, BPsc around next 5 sts, ch 1, sk st (this is the FPsc in the middle of your 3-puff shell), BPsc around next 5 sts, *working in BLO, sc in next 23 sts, BPsc around next 5 sts, ch 1, sk st (this is the FPsc in the middle of your 3-puff shell), BPsc around next 5 sts; repeat from * around, working in BLO, sc in final st of round, join with sl st to first sc. (92 sc, 40 BPsc)

In the following round I strung the green color loosely around the corners and then worked over the yarn in round 17.
Round 16: sl st into next st, ch 1, *sc in next st, [with color C, psc in next st, with color B, sc in next st] 8 times, sk 2 sts, 6dc in next st, sk 2 sts, sl st in next st, sk 2 sts, 8 dc in ch-1 sp, sk 2 sts, sl st in next st, sk 2 sts, 6 dc in next st, sk 2 sts; repeat from * around, join with sl st to first sc. (32 psc, 36 sc, 8 6-dc shells, 4 8-dc shells)
Drop color C and fasten off.
Here is a close-up of the repeat section:

And here is the completed round:

With Color B,
Round 17: ch 1, *sc in next 17 sts, with color A, BPhdc around next st, BPsc across next 4 sts, BPhdc around next 4 sts, BPsc around next st, ch 2, BPsc around next st, BPhdc around next 4 sts, BPsc across next 4 sts, BPhdc around next st, with color B; rep from * around, join with sl st to first sc. (37 sts per side)
Drop Color B and fasten off.

With Color A,
Round 18: ch 1, *working in BLO, sc in next 17 sts, sc in next 10 sts, (hdc, ch 1, hdc) in ch-2 sp, sc in next 10 sts; repeat from * around, join with sl st to first sc. (39 sts per side)

If you need your square a little larger:
Round 19: ch 1, working in back bar of sc, sc in each st around (sc, ch 1, sc in ch-1 sps at corners), join with sl st to first sc. (41 sts per side)

Fasten off, and weave in ends.
Block if desired.
.sdg.
Want more gorgeous crochet patterns, and a little encouragement for your day? Sign up for my newsletter here! That way you’ll never miss out on special events, or freebies I’m offering.
JOIN ME ON SOCIAL MEDIA
I would love to see a picture when you’re done, so please feel free to come by my Facebook group and show off your finished project! Be sure to tag @kirstenhollowaydesigns when you share pictures of your project on Instagram!
You can also follow me on Facebook, Pinterest, Instagram, and Ravelry for more beautiful crochet patterns.
PATTERN TERMS AND CONDITIONS:
You are welcome to share the link to this pattern, using one image of your choice, on your site, but please do not share the written patterns themselves, this includes my Ravelry downloads or translations of these patterns, or use additional images. You do not have permission to use my images by themselves to create pinnable graphics for Pinterest, however they may be included in a roundup pin if there are 4 or more other patterns. If you sell finished items online, please do not use my pictures for your listings. I’m positive that your work is of high enough quality for you to sell the finished piece. Have confidence in your abilities! <3 Thank you!
This pattern was made to be used by individuals and small business crocheters alike. Selling your finished pieces in boutiques, at farmer’s markets, craft shows, and other local events is encouraged! Please credit/link Kirsten Holloway Designs when selling finished products online. The only thing I require is that this pattern not be used commercially to produce hundreds of thousands of copies. If you enjoyed this pattern or found it useful, why not share a link to this post with your friends?


Leave a Reply