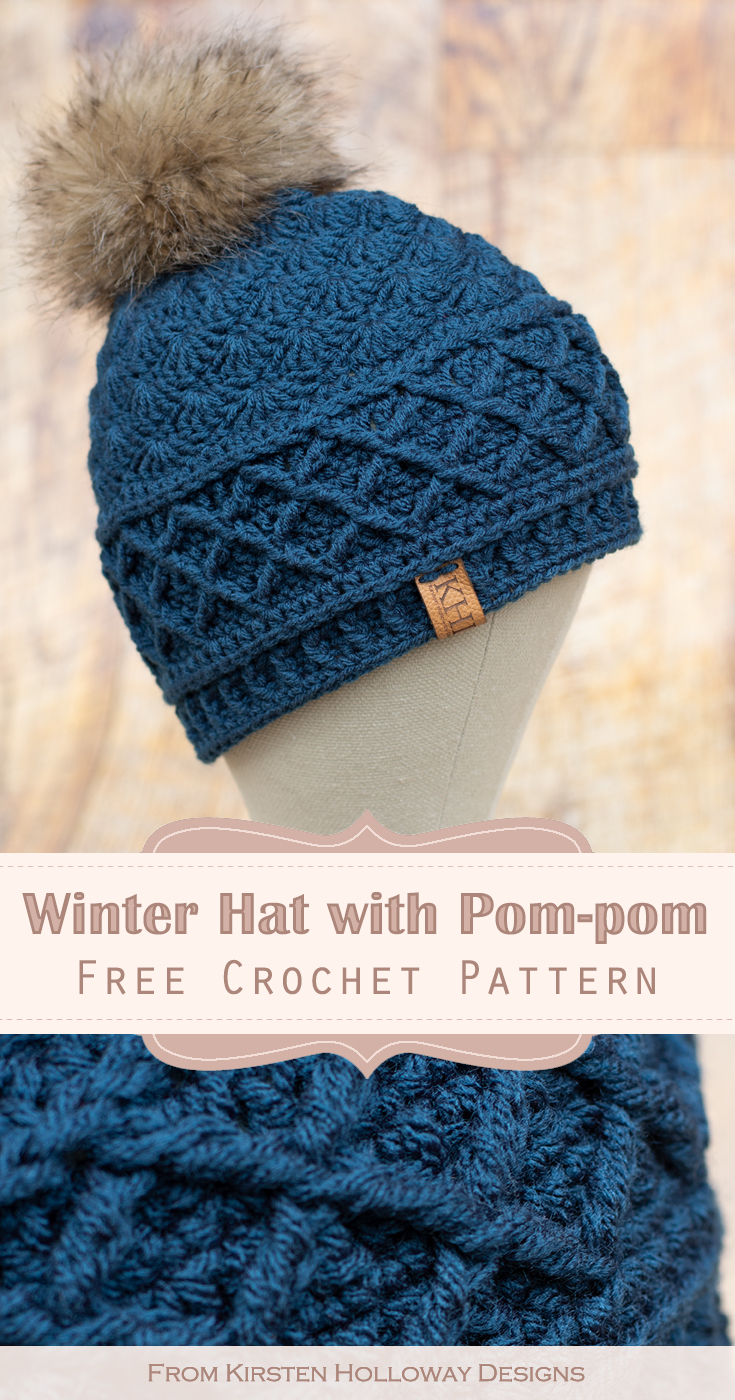
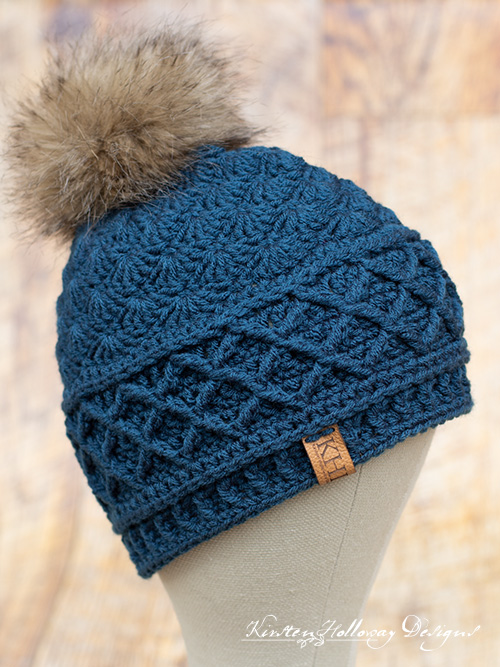
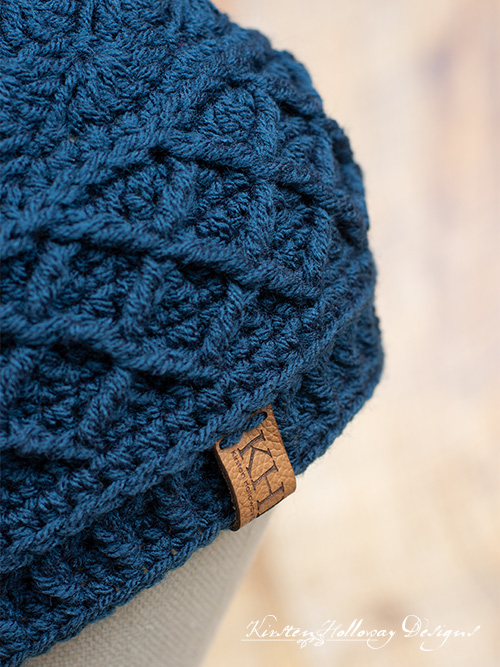
This cute, textured crochet beanie hat will look just as good on men as it does on women! The diamond stitch adds a double layer of warmth to this hat, and will keep you warm this winter. Find the free crochet pattern instructions below, or purchase a print-optimized, ad-free PDF by clicking here.
I’ve included instructions at the bottom of the page for making your own faux fur pom-pom, or you can leave the hat plain.
Make it a set: the Snow Country Super Scarf is available over here.
Click here to add this pattern to your Ravelry queue!
Disclaimer: This post contains affiliate links. When you purchase something using these links a small amount of the sales price goes to me to help keep this site, and the patterns on it free. You do not pay any extra for the item you purchase.
Difficulty:
Intermediate/Advanced
Techniques used: working in the 3rd loop of a half-double crochet, shell stitches, Diamond Stitch (front post stitches), reverse single crochet (crab stitch).
Materials Needed:
5mm (H) hook, or hook needed to obtain gauge
200-225 yards of Red Heart Super Saver in the color of your choice, or try Red Heart Heatwave in “Ocean” for extra warmth
yarn needle
scissors
(Optional) small amount of faux fur material for pom-pom
(Optional) pom-pom maker
Stitches Used:
sc = single crochet
sl st = slip stitch
sc2tog = single crochet 2 together
hdc = half-double crochet
dc = double crochet
FPtr = front post treble crochet
FPtr2tog = front post treble crochet 2 together
reverse sc = reverse single crochet (crab stitch)
st/sts = stitch/stitches
Stitches Used:
sc = single crochet
sl st = slip stitch
sc2tog = single crochet 2 together
hdc = half-double crochet
dc = double crochet
FPtr = front post treble crochet
FPtr2tog = front post treble crochet 2 together
rsc = reverse single crochet (crab stitch)
st/sts = stitch/stitches
Additional Terms:
Working in the 3rd loop of hdc: Look at the top of the stitch, and locate the sideways “V”, bend the stitch to look at the back, and you should see another “V”. You’ll be working into the back loop of that “V”, this is called the 3rd loop.
Gauge:
14 dc stitches in 4″
Measurements:
8.5” tall and 10.5″ wide. It should fit an adult.
Additional Notes:
-To work this pattern you must be familiar with the Diamond Stitch, the Shell Stitch, and the Reverse Single Crochet, or Crab Stitch. Click on the links to view some excellent tutorials from Moogly, and Hopeful Honey on how to work these stitches.
-FPtr2tog counts as a stitch. Don’t forget to skip that spot in your round when making the stitch
-If you want a smaller hat for a child try going down a hook size. If you want a hat that will fit a toddler try going down a hook size from what is listed, and use a #3 yarn. I have not personally tested these options.
Snow Country Beanie Pattern (US Terms):
Click here to purchase an ad-free, print-optimized PDF of this pattern on LoveCrafts
OR
Pick up the printable version of this pattern on Etsy instead
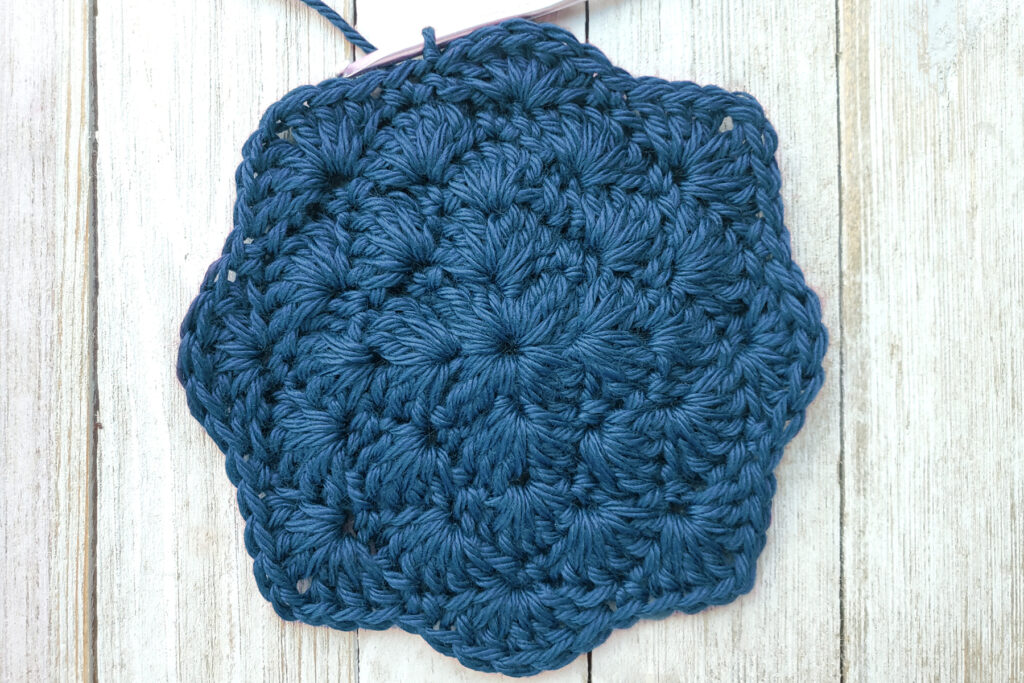
Round 1: working in magic circle, [sc, 5 dc] 4 times, join with sl st to first sc. (4 5-dc shells, 4 sc)
Your piece will take on a square appearance after completing this round. Don’t be alarmed–this hat will change shape many times over the course of the next few rounds, and will not start to look circular until after finishing a couple rounds with no increases.
Round 2: sl st over 2 sts to top of first shell, ch 1, *sc in next st (this will be the 3rd stitch of your 5-dc shell), sk 2 sts, (3 dc, ch 1, 3 dc) in sc, sk 2 sts; repeat from * around, join with sl st to first sc. (4 split shells, 4 sc)
Round 3: sl st over 1 st, ch 1, *sc in next st (this will be the center st of split shell), sk st, 5 dc in ch-1 sp, sk st, sc in next st, sk st, 5 dc in sc, sk st; repeat from * around, join with sl st to first sc. (8 5-dc shells, 8 sc)
Round 4: sl st over 2 sts to top of first shell, ch 1, *sc in next st, sk 2 sts, 5 dc in next st, sk 2 sts; repeat from * around, join with sl st to first sc. (8 shells, 8 sc)
This is how your piece should look after completing round 4:

Round 5: sl st over 2 sts to top of first shell, ch 1, *sc in next st (this will be the 3rd stitch of your 5-dc shell), sk 2 sts, work (3 dc, ch 1, 3 dc) in sc, sk 2 sts, sc in next st, sk 2 sts, 5 dc in next st, sk 2 sts; repeat from * around, join with sl st to first sc. (4 split shells, 4 shells, 8 sc)
This is how your piece should look after completing round 5:
Round 6: sl st over 1 st, ch 1, *sc in next st (this will be the center st of split shell), sk st, 5 dc in ch-1 sp, sk st, sc in next st, sk st, 5 dc in next st, sk 2 sts, sc in next st, sk 2 sts, 5dc in next st, sk st; repeat from * around, join with sl st to first sc. (12 5-dc shells)
This is how your piece should look after completing round 6:
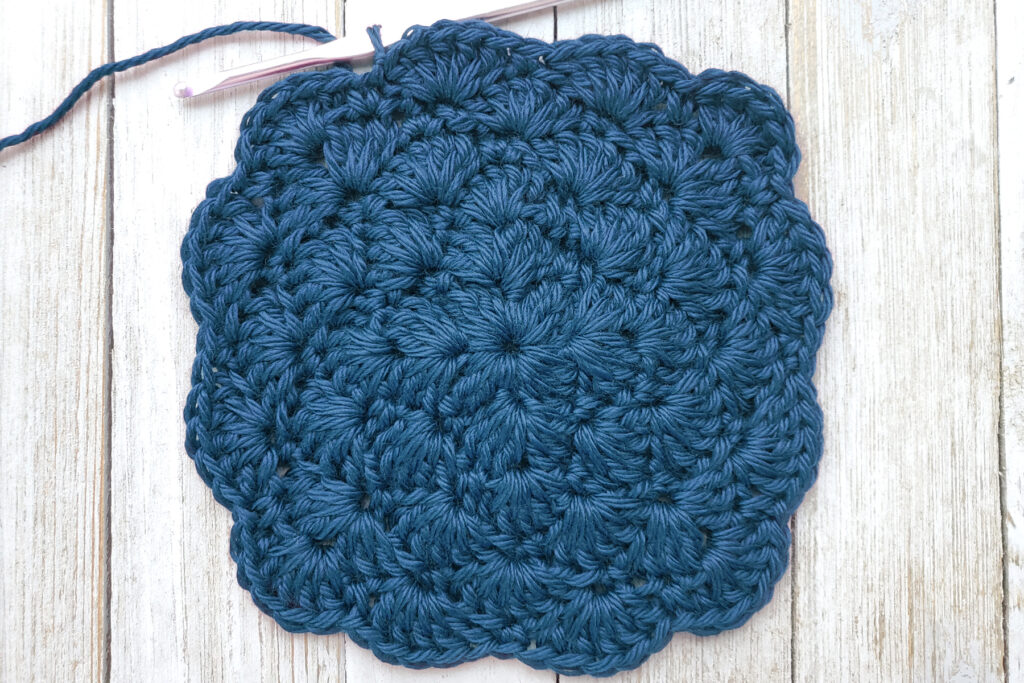
Rounds 7-10: sl st over 2 sts to top of first shell, ch 1, *sc in next st, sk 2 sts, 5 dc in next st, sk 2 sts; repeat from * around, join with sl st to first sc. (12 5-dc shells)
**Your hat should measure at least 10” from side to side, after you finish this top part of the hat. From the crown of the hat to where the shells end, should measure at least 5”**
Round 11: ch 1, hdc in each st around, join with sl st to first hdc. (72)
Round 12: ch 1, working all sts of round in 3rd loop of hdc, sc in each st around, join with sl st to first sc.
Round 13: ch 1, dc in each st around, join with sl st to first dc. (72)
Round 14: ch 1, FPtr around the 2nd sc of round 12, sc in next 3 sts, FPtr2tog, placing first leg around same sc in round 12 that you just worked the first FPtr around, move forward 3 sts in round 12 and place second leg of the FPtr2tog around the 4th sc, sc in next 3 sts of current round, *FPtr2tog, placing first leg around same sc in round 12 that you put the last leg of the previous FPtr2tog, skip forward 3 sts in round 12, and place second leg of the FPtr2tog around the 4th sc, sc in next 3 sts of current round; repeat from * across, When you get to the last stitch in your round, FPtr around the last FPtr2tog leg you made, before you finish the FPtr, when there are 2 loops left on your hook, insert hook into last st of round, YO, and pull through all remaining loops, join with sl st to first FPtr. (72)
Round 15: ch 1, dc in each st around, join with sl st to first dc. (72)
Round 16: ch 1, sc in same st as join, sc in next st, FPtr2tog, placing first leg around the top of the first AND last FPtr in round 14 (this will pull them together to look like they are one stitch), put the second leg around the next FPtr2tog from round 14. *sc in each of the next 3 sts, FPtr2tog placing first leg around the top of the FPtr2tog in round 14 that you just came off of, place the second leg of the FPtr2tog around the next FPtr2tog from round 14; repeat from * around, (Note: The final leg of the final FPtr2tog will be worked around the same stitches as the first leg of the first FPtr2tog in the round), sc in final st of round, join with sl st to first sc. (72)
Round 17: ch 1, dc in same st as join and each st around, join with sl st to first dc. (72)
Round 18: ch 1, FPtr around next post stitch of round 16, sc in next 3 sts. FPtr2tog, placing first leg around same post stitch in round 16 that you just did the first FPtr around, move forward 3 stitches in round 16 and place second leg of the FPtr2tog around the next post stitch, sc in next 3 sts of current round *FPtr2tog, placing first leg around same post stitch in round 16 that you put the last leg of the previous FPtr2tog, skip forward 3 sts in round 16, and place second leg of the FPtr2tog around the next post stitch, sc in next 3 sts of current round; repeat from * around, when you get to the last stitch in your round, FPtr around the last FPtr2tog leg you made, before you finish the FPtr, when there are 2 loops left on your hook, insert hook through that last stitch, YO, and pull up a loop, insert your hook under the first FPtr, and then pull that loop through all remaining loops. This will join the round. (72)
Round 19: ch 1, hdc in each st around, join with sl st to first hdc. (72)
Round 20: ch 1, working all sts of round in 3rd loop of hdc, sc in each st around, join with sl st to first sc. (72)
Choose which ending you want:
Crab Stitch edging:
Rounds 21-23: ch 1, sc in each st around, join with sl st to first sc. (72)
Round 24: rsc or crab stitch in each st around. (72)
Fasten off, and weave in ends.
OR
Ribbed band edging:
Rounds 21-22: ch 1, FPhdc around first st, BPhdc around next st, join with sl st to first FPhdc. (72)
Round 23: ch 1, sc in each st around, join with sl st to first sc. (72)
Fasten off, and weave in ends.
Making the faux fur pompom:
Materials Needed:
¼ yard Luxury Faux Wolf Fur Fabric material – Grey
Scissors or an X-ACTO knife
Marker
3 ft Button Thread/crochet thread
Sewing needle
Polyester stuffing (fiber fill)
Faux Fur Pom-pom Instructions:
- Trace a circle around a small bowl or cup using a marker, on the back side of the fabric. My circle was 5″ across.
- Cut out the circle. Only cut the fabric backing–not the fur itself!
- With your needle and thread, sew a loose running stitch near the edge of the circle
- Take a small amount of polyester stuffing and put it in the middle of the circle.
- Tug on the ends of the thread to cinch the circle into a ball. It should be snug so the fiber fill doesn’t come out.
- Tie off securely, and then sew the pom-pom to your beanie.
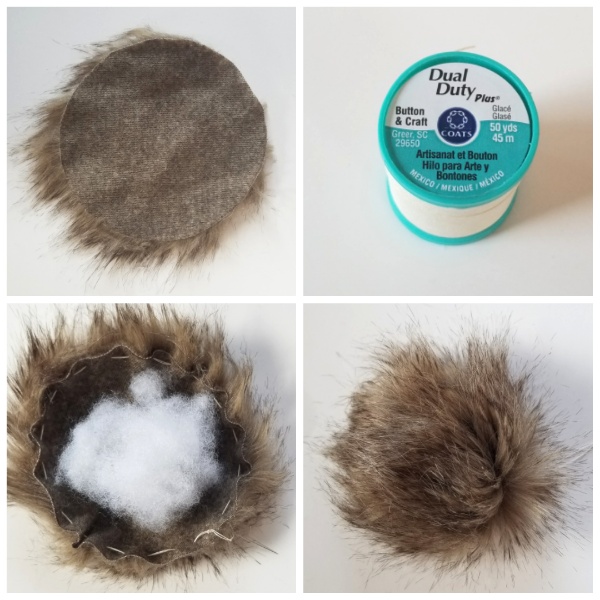
OR
Use yarn and a large pom-pom maker instead.
Friends, if you enjoyed this pattern don’t forget to sign up for my encouraging crochet newsletter! That way you’ll never miss out on special events, or freebies I’m offering.
JOIN ME ON SOCIAL MEDIA
I would love to see a picture when you’re done, so please feel free to come by my Facebook group and show off your project! Be sure to tag @kirstenhollowaydesigns when you share pictures of your finished hat on Instagram!
You can also follow me on Facebook, Pinterest, Instagram, and Ravelry for more beautiful crochet patterns.
PATTERN TERMS AND CONDITIONS:
You are welcome to share the link to this pattern, using one image of your choice, on your site, but please do not share the written patterns themselves, this includes my Ravelry downloads or translations of these patterns, or use additional images. You do not have permission to use my images by themselves to create pinnable graphics for Pinterest, however they may be included in a roundup pin if there are 4 or more other patterns. If you sell finished items online, please do not use my pictures for your listings. I’m positive that your work is of high enough quality for you to sell the finished piece. Have confidence in your abilities! <3 Thank you!
This pattern was made to be used by individuals, and small business crocheters alike. Selling your finished pieces in boutiques, at farmer’s markets, craft shows, and other local events is encouraged! The only thing I require is that this pattern not be used commercially to produce hundreds of thousands of copies.
If you enjoyed this pattern or found it useful, why not share a link to this post with your friends?


Hi Kirsten,
I adore the pattern so far!
But now I am at the end and not quite understanding it anymore.
For the Ribbed band edging, it says to join the BPhdc with sl st to first FPhdc.
I am confused on how to do this. I have never worked with either of these stitches before, which does not help with my confusion.
Does the sl st go in the chain space? or do you leave the first FPhdc unfinished on the hook and then pull the working yarn through all three loops after the BPhdc?
And the next FPhdc in front of the same Post as the last BPhdc?
I hope these questions make any sense at all!
Still, thank you a lot for the pattern, the (almost) finished hat looks amazing and I am for sure going to make a second one!
Hi Nina,
I’m glad you like the hat so far! The ribbed band should start with a FPhdc, and then alternate between that and BPhdc, so at the end of your round, if you have an “even” number of stitches you should join with a slip stitch to the first FPhdc. If you’re not sure how to work the stitch YouTube has some good tutorials that can help. Here is one that shows how to work FPdc and BPdc which are very similar to FPhdc and BPhdc: https://youtu.be/lbCf2M4gua4 You’ll want to pay close attention starting at about the 3:00 minute mark.
Hi Kirsten,
That makes so much more sense!
Thanks for the clarification, and the link. It helped a lot!
You’re welcome! I’m glad it helped!
Hi. I LOVE this hat. I am having the worst time with round 14. I am ending up with way too many stitches, can’t get the count to 72. What am I doing wrong?! Do you have a video tutorial on how and where to place the FPTRC and the FPTRC2TOG stitches ?
Thanks!
Hi Laura,
If you are having trouble with the Diamond Stitch I have a link to a video tutorial that helped me when I was first learning this stitch. It’s in the Additional Notes section before the pattern begins. 🙂 I hope that helps!
Hi, I’m having a nightmare between round 5 and 6 and can’t work out the issue. How many shells and split shells should I have at the end of round 5, it doesn’t say?
By only skipping one stitch as per round 6 pattern I’m not hitting the chain stitch spaces or the single crochet and I’m not sure if that’s right or not as in the pattern it talks of those places.
I am aware some are only one sk st and others are 2 but still not working out.
I’d really like clarification without having to join your Facebook group and the search through screeds to find the solution.
I can see others have had issues at this step too.
Since this is an increase round you should have 4 split shells, and 4 regular shells with a single crochet between each. I’ve put some pictures in for these rounds so you can see what they look like after they are completed. I hope it helps!
To make the magic circle how many stitches should I have, 4, 5 or 6. I’m confused. Your instructions for the magic circle are clear but you don’t state how many sts to do for the beanie.
Thanks.
The magic circle is just a slip knot that is partially completed. You then work the stitches from round 1 into that. You should have 4 5-dc shells, and 4 sc stitches in the circle once the first round is completed. Afteryou you cinch the magic circle up then the shells will actually start to look like shells. 😊 I hope that helps!
Oh thank you. That’s so clear now.
Would this hat work up to be the right size if I use Caron Simply Soft yarn or Yarn Bee Soft Secret yarn? They both are listed as worsted (a thickness of 4) but they are actually softer and a little thinner than normal worsted straight. They aren’t as thin as fingering or baby yarn though.
Hi Sarah,
Since they are thinner than the yarn I recommend, your hat would probably come out a bit smaller and would most likely fit a child instead of an adult. You could try going up a hook size or two, but then the hat may be too “thin” looking as there would be more space between the stitches.
Thank you for sharing this beanie pattern. I just finished the beanie and it turned out perfect! The directions were great. I am an experienced crocheter, so I found the directions to be clear and accurate. I also appreciate the directions for the pom pom. Thank you again!
You’re welcome, Patti! I’m glad you are pleased with your beanie! 😊
Hi Kristen!
This is a gorgeous pattern, I love it! Would you say it can work with a chunky yarn, because that is currently what I have (I have a knack for every time accidentally buying the wrong weight of yarn!) and I do crochet quite tightly.
Thank you!
Cayla,
I’m glad you like the pattern! You could try using chunky yarn if you crochet very tightly, but the hat may turn out pretty stiff and might not be so comfortable to wear. 😅
Hi Martine,
The shell stitches are worked in the magic circle the same as single crochet and double crochet stitches would be on other crochet patterns. The center, top of your hat will need to have the tail woven in to close the hole completely because having that many shells worked at the center makes things it is very bulky. I hope this helps you understand the instructions better! 🙂
Running the risk of looking slightly stupid… how do I form the circle prior to row 1 if you know what I mean? Sorry you may have made it clear and I’m over looking it, I’m just stumped…. I’d appreciate your guidance, thank you in advance : )
#lovethepattern #thankyou
Angie,
I put together a picture tutorial for how to make the magic circle right here: https://kirstenhollowaydesigns.com/2021/06/how-to-crochet-the-magic-ring-easy-picture-tutorial.html
I hope that helps! 😊
I looooove this pattern, thank you Kirsten!
You’re welcome! 😊
You gave two options for the finish. Which one do you have pictured?
The dark blue hat is using the ribbed brim. 😊
On round 12 it says : Round 12: ch 1, working all sts of round in 3rd loop of hdc, sc in each st around, join with sl st to first sc.
Are you using the front third loop or the back third loop?
It’s the back 3rd loop so that the top of the stitch bends towards the outside of the hat and creates a ridge. 🙂
Do you have matching pattern for adult mittens?
Hi Suzanne,
I do not have a mitten pattern at this point.
Where did you get your tag for the hat? So cute.
I picked mine up at All This Wood on Etsy. They have a wide variety of tags available for customization. 😁
Hello, just came across your Pinterest page today. So many beautiful projects. It’s coming up to winter, and I’d like to make myself another beanie in white. But I find that most beanie patterns are too short, and don’t cover/protect my ears. I measured, and 8.5” wouldn’t be long enough for my liking. I would like to make it an inch longer. Where would you recommend adding rows, to do this?
Hi Kaylene,
This pattern is pretty versatile as far as length goes. You can either add 1-2 more rounds of shells (round 10) before moving on to the diamond stitch section, or you can repeat a couple more rounds of the diamond stitch if you understand how to work it. I hope that helps! 🙂
On row 14 I’m ending with about 10 fewer stitches than the 72. I’ve tried it a couple times and can’t seem to get the 72.
If your stitch count on the previous round is correct, make sure you are skipping only one stitch for the FPtr2tog to sit before you make the 3 single crochet stitches between. You may want to place a stitch marker where the FPtr2tog should be to help. 🙂
This pattern is for adults size?
Can we find it also for kids and babies?
This is only an adult sized beanie pattern. You are welcome to try using a smaller crochet hook and see if it will fit a child though. 🙂
Thank you so much for this pattern. I’m a beginner but managed to complete the scarf and the beanie. Your explanation was really good.
Thanks again.
You’re welcome! I’m glad you enjoyed it, Sujatha!
Where is the scarf pattern?
Lisa, the scarf pattern is linked near the top of the post, right where it says “Make it a set:”. 🙂