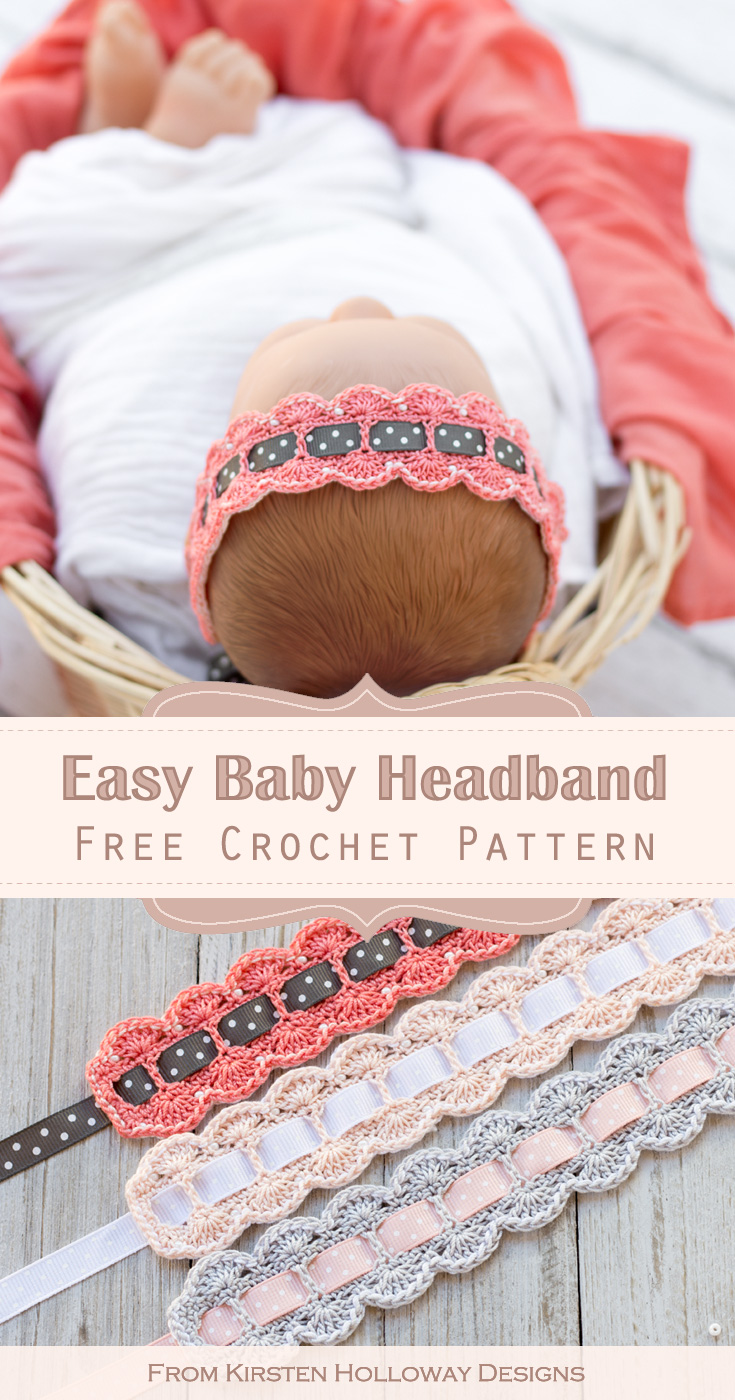
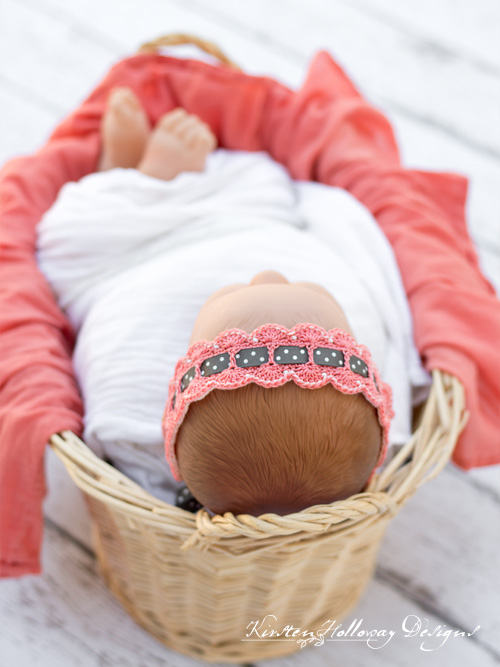
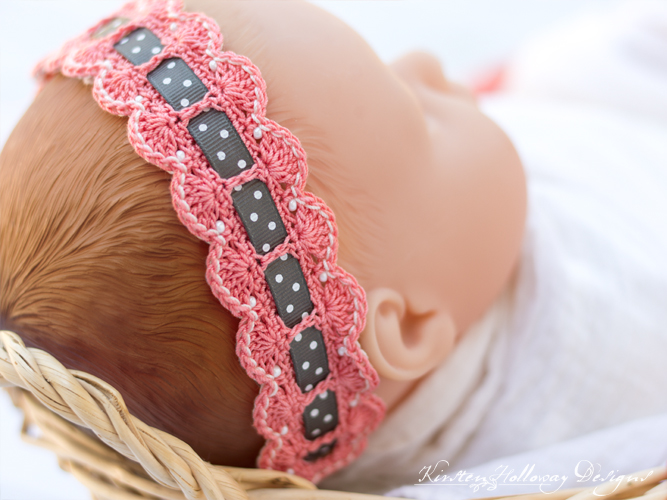
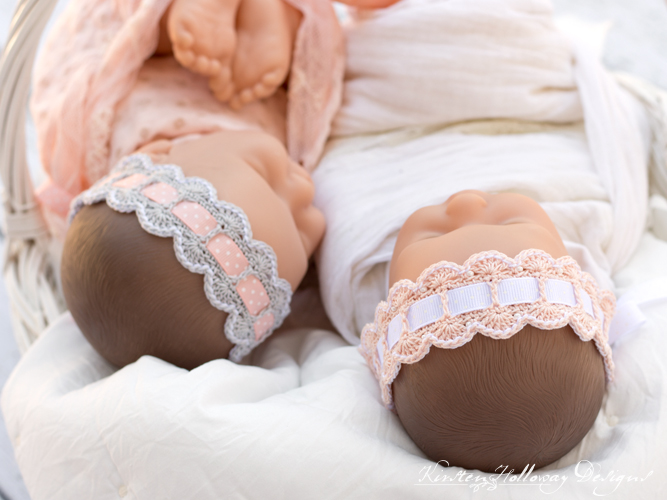
This dainty, scalloped lace crochet baby headband pattern is quick and easy to work up, and perfect for beginners who are just starting to experiment with crochet thread. It would make a nice last-minute baby shower gift. Ribbon of any color can be threaded through the center of the headband and changed out with the seasons. Find the free crochet pattern instructions below, or purchase a print-optimized, ad-free PDF by clicking here.
Click here to add this to your Ravelry queue!
Disclaimer: This post contains affiliate links. When you purchase something using these links a small amount of the sales price goes to me to help keep this site, and the patterns on it free. You do not pay any extra for the item you purchase.
Difficulty:
Beginner/Easy
Techniques used: shell stitch, surface slip stitching, single crochet, double crochet,
How long does this project take?: about 45 minutes to 1 hour depending on your skill and speed.
Materials Needed:
1.9mm (#5) steel hook, or hook needed to obtain measurements
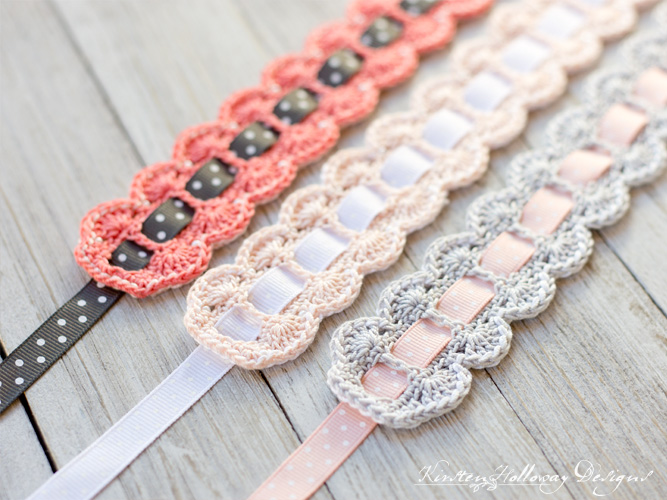
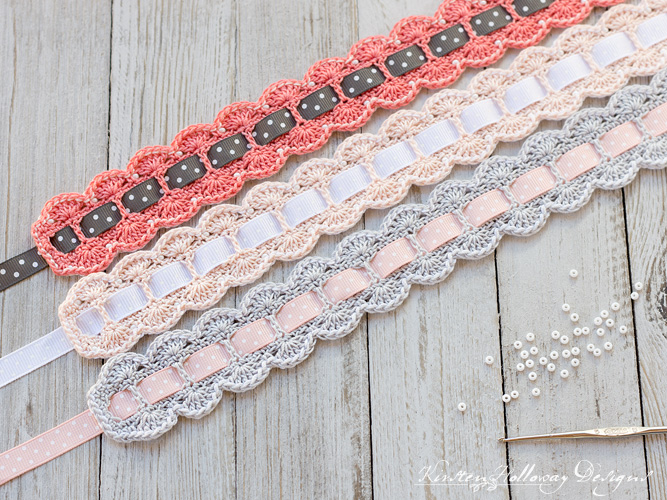
25-30 yards Aunt Lydia’s #10 Crochet thread in Bright Coral, Silver, Light Peach, White, or 4 colors of your choice
1 yard of 3/8″ or 1/4″ ribbon per headband in color of your choice
ribbon needle, and yarn needle
scissors
fray check or clear nail polish
30 (36, 40, 44) Opaque White Luster 8/0 seed beads per headband
Flexible beading needle
Stitches Used:
ch = chain
sl st = slip stitch
sc = single crochet
dc = double crochet
sp/sps = space/spaces
st/sts = stitch/stitches
sk st = skip stitch
Additional Terms you’ll need to know:
Shell = 6 dc in same st Shell stitches are one of the very first stitches I learned to crochet as a child because of how easy they are to make–it is the perfect stitch to use as an introduction to crocheting lace! To make sure your shells are lining up evenly when crocheting rows 4 and 5 make sure your shells are centered directly over a dc stitch from row 2, and the sc between each shell should be positioned in the space between the dc stitches in row 2. This is very important and will ensure your shells are lined up evenly on both sides of the headband.
Measurements:
- Finished headband should measure about 11 1/2″ long by 1 1/4″ tall as written. This should fit most 0-3 month old babies.
- It is easy to size the headband up to fit a wide range of head sizes! The pattern is worked in multiples of 6 +3 (+1 for the turning chain). Each additional shell should add just a touch over 3/4″ of length. Try chaining 106 for 3-6 mos (17 shells), 118 for 12-24 mos (19 shells), or 130 (21 shells) for an adult.
Additional Notes on how to crochet your headband:
It is important to remember that this headband is not a toy and the baby should never be left unattended while wearing it.
- ch-1 at beginning of row does not count as a stitch.
- If you make your headband with beads: In order for your beads to show up on the right side of your headband it is imperative that you follow this method that I show off in the video below. It is different than the way most people attach their beads:
- Pull your stitch with the bead tight before moving on to the next stitch. When following the method from the video, the beads will “float” closer to the center instead of the absolute front or back, but by pulling them up the way I show they will be visible from the front as well. Adding the slip stitching around the whole headband will further encourage your beads to not be shy and hide at the back. Make sure you push the bead forward to the front if it tries to fall to the back when doing the slip stitch round.
- Increase by 2 beads for each shell you plan to add if you are increasing the size of the headband. String your beads onto your working thread with a bead needle before you begin this project.
- If you’re just starting out with thread it’s important to remember that cotton string is not as stretchy as acrylic yarn, so a big part of the way you get crochet lace to have nice drape is to really watch your tension. I had to go up a couple of hook sizes at first in order to meet the measurements, so if you find that you need to do that, it’s perfectly acceptable. The next thing to remember is that since thread is much smaller than yarn you’ll want to work your projects in a well-lit room so you don’t hurt your eyes.
Easy Lace Baby Headband Pattern (US terms):
Click here to purchase an ad-free, print-optimized PDF of this pattern on LoveCrafts
Ch 88, 106, 118, 130,
Row 1: sc in second ch from hook and in each st across, ch 4 (counts as first dc + ch-1), turn. (87 [105, 117, 129])
Row 2: *sk st, (dc, ch 1) in next st; repeat from * across, dc in final st of row, ch 1, turn. (44, [53, 59 65] dc, 43, [52, 58, 64] ch-1 sps)
Note: Rows 3 and 4 are “L” shaped. You will work along the long side of the headband and then work across the end in both rows. This will get you around the whole headband.
Row 3: sc in each dc and in each ch-1 sp across, note: final 2 sc sts of row will be worked into the 4th and 3rd chs of the ch-4 from the end of row 1/beginning of row 2, when you get to the end of the row ch 1, and continue working sc evenly across end (approximately 5 sts): sc in side of sc just made, 3 sc in ch-sp, sc in side of sc from row 1, ch 1, continue around corner to begin row 4. (87 [105, 117, 129]) sc in row + 5 across end)
Place stitch markers in both of the ch-1 sps at end of row. This will help you if you decide to do the fancier trim option on this headband a little later on.
If you are crocheting this with beads make sure you have read the “Additional Notes” section and watched the video of how to do this step. If you do not wish to make this with beads simply ignore the instructions that tell you to pull up a bead in rows 4 and 5.
Row 4: sc in first st, pull up a bead following the instructions in this video, sc in next st, *sk 2 sts (you should be right over a dc st at this point), shell in next st, sk 2 sts, pull up a bead, sc in next st; repeat from * across, sc in final st of row, sc evenly across end of headband (approximately 5 sts) in the same manner as you completed the other end, and continue working around corner. (14 (17, 19, 21) shells, 17 (20, 22, 24) sc in row + 5 across end)
Row 5: sc in first st, pull up a bead following the instructions in this video, sc in next st, *sk 2 sts (you should be right over a dc st at this point), shell in next st, sk 2 sts, pull up a bead, sc in next st; repeat from * across, sc in final st of row, join with sl st to end of headband.
Fasten off, and weave in ends.
Join white thread,
With the wrong side of the headband facing you, sl st around the edge of the entire headband. Make sure your beads are pushed toward the front of the headband while you complete this step.
Fasten off, and weave in ends.
It is important to remember that this is not a toy and the baby should never be left unattended while wearing it.
Looking for more baby patterns that can be made with crochet thread?
Lavender Blue Baby Bonnet (Easy/Intermediate)
Rosemary Green Baby Bonnet (Intermediate)
Victoria Rose Baby Bonnet (Advanced)
Finishing your baby headband
Using 36″ length of ribbon weave through spaces with a ribbon or yarn needle. For durability, use fray check or a tiny amount of clear nail polish to seal the very ends of the ribbon.
Your ribbon can be any color, as can the headband. If you are making this for a new mom as a baby gift you can even include several different colored ribbons that can complement and contrast with each headband to string through the center. This way the band will go with more outfits.
For even more variety, I used reversible ribbon for the headbands pictured, meaning they had polka-dots on one side but were plain colored on the other. That gave me even more ways my set of 3 headbands could be mixed and matched!
Adding bows and flowers to your headband
- Add a simple crochet bow by following the bow pattern at the bottom of this page (but make it with a 1.5mm hook and crochet thread–not yarn), or buy a pre-made bow from the craft store and sew it on.
- This pattern makes a tiny flower that should end up being about as wide as the headband if you make it with a 1.5mm hook.
- For a statement piece try the gorgeous flower that comes with this bag. Scroll to the bottom of the post to find the pattern.
Join me on social media
I would love to see a picture when you’re done, so please feel free to come by my Facebook group and show off your project! Be sure to tag @kirstenhollowaydesigns when you share pictures of your finished baby headband on Instagram, and use #scallopedlacebabyheadband!
You can also follow me on Facebook, Pinterest, Instagram, and Ravelry for more beautiful crochet patterns.
This baby headband has been featured on AllFreeCrochet‘s website
Pattern Terms and Conditions:
You are welcome to share the link to this pattern, using one image of your choice, on your site, but please do not share the written patterns themselves, or use additional images. You do not have permission to use my images by themselves to create pinnable graphics for Pinterest, however they may be included in a roundup pin if there are 4 or more other patterns. If you sell finished items online, please do not use my pictures for your listings. I’m positive that your work is of high enough quality for you to sell the finished piece. Have confidence in your abilities! <3 Thank you!
This pattern was made to be used by individuals, and small business crocheters alike. Selling your finished pieces in boutiques, at farmer’s markets, craft shows, and other local events is encouraged! The only thing I require is that this pattern not be used commercially to produce hundreds of thousands of copies.
If you enjoyed this pattern or found it useful, why not share a link to this post with your friends?


